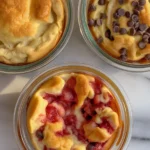
Baked Protein Pancake Bowls
Ever had one of those mornings where you stare at your kitchen and just lose all hope for breakfast? Baked Protein Pancake Bowls come to the rescue when pancakes sound amazing, but actually standing around a griddle—not gonna happen.

They’re the kind of thing you can toss together on busy mornings or even prep in advance for a week that’s already wearing you out. If you like these, I bet you’ll go wild for this simple banana pancake bites recipe too. Okay, real talk—let’s get into it.
Why You Will Love These Baked Protein Pancake Bowls
First off, the obvious—you get pancakes in a bowl. I mean, how fun is that? There’s just something cozy about digging straight in with a spoon instead of stacking and syrup-drizzling each one. But what really won me over is how fast it is. Instead of flipping batches, I get to let the oven do, like, 95% of the work (and my hands stay mostly clean).
Plus, these loaded little bowls pack some serious protein. So, you’re not gonna crash two hours later. I love how easy it is to throw in different toppings—chocolate chips, berries, or whatever your heart desires. The personalization might actually be my favorite part. Nothing fussy, just full-on customizable breakfast joy.
Mornings got way less stressful once I started making them, and I can honestly say my whole family—yes, even the picky ones—get excited when they know these are on deck.
“I would rate these Baked Protein Pancake Bowls higher than any fancy brunch I’ve had out. So simple but crazy tasty!” — Sara D.
Baked Protein Pancake Bowls
Ingredients & Substitutions
Let’s talk basics. To whip up a batch of Baked Protein Pancake Bowls, you’ll need stuff you probably already have. Here’s what I keep handy:
- Oats (I use quick oats, but rolled work fine. Steel-cut doesn’t, trust me. Disaster.)
- Protein powder (Vanilla is my go-to, but chocolate gives dessert-for-breakfast vibes.)
- Milk (Whatever you like. Cow’s milk, oat milk, almond, or even that half carton of soy milk hiding in the back.)
- Eggs (Don’t skip these if you want that fluffy texture.)
- A pinch of baking powder (This is your best friend for extra lift.)
- Maple syrup or honey (Just a spoonful if you like things sweet.)
- Cinnamon and a dash of salt (Not strictly necessary, but why not jazz it up?)
Sub swaps? You can totally make this dairy-free or even eggless with flax eggs. I’ve thrown in Greek yogurt before for extra creaminess (game-changer!). No matter what, it’s forgiving—so don’t panic if you’re missing one thing.
Baked Protein Pancake Bowls
Recipe Variations
Okay, so I never make these the same way twice. There’s just TOO much room for experimenting. If you want crunch, toss in nuts. Feeling lazy about chopping? Frozen berries work straight from the bag. Sometimes I swirl in peanut butter before baking—you get gooey pockets! If you wanna up the fiber, flaxseed or chia seeds go right in with zero trouble.
One wild time, I threw in some shredded coconut and chopped pineapple (was chasing that tropical smoothie flavor). You could even go savory with a sprinkle of cheese and herbs. Honestly, there are no rules. Each time turns out different, but always satisfying—baked protein pancake bowls are that sort of “taste test” breakfast where you weirdly hope no one else is home so you can eat straight from the dish.
Baked Protein Pancake Bowls
Cooking Tips
You don’t need chef skills for these, but a few things help. First, spray your bowls or muffin tin, because sticky pancake bowls are the worst. Don’t overfill—these puff up while baking, and I’ve had batter overflow like a science experiment.
I bake at 350°F for about 18-22 minutes. Ovens can be finicky, though. If a toothpick comes out mostly clean, you’re golden. (Just don’t overbake—otherwise, they get dry faster than winter skin).
Let them cool a bit before digging in, or you’ll scorch your tongue and grumble the rest of the morning (been there). Oh, and don’t forget the toppings! Sometimes I sprinkle extra berries or a dollop of yogurt on top just before serving.

Storage And Meal Prep
Truly, Baked Protein Pancake Bowls are made for meal prep. Once they cool, pop them in an airtight container. They’ll keep in the fridge for about four days—maybe longer, but mine have never actually lasted that long. Just heat ‘em up in the microwave (30 seconds should do).
Freezing? Sure thing, especially if you make a double batch. I just wrap them individually. Reheat directly, or if you remember, defrost overnight in the fridge.
A quick tip: if you want ‘em softer, add a splash of milk before microwaving. They fluff up again and taste almost like fresh-baked.
- Serving Suggestions
- Add a spoonful of your favorite nut butter before eating.
- Top with fresh fruit or a drizzle of maple syrup for a weekend treat vibe.
- Sometimes I chop one up and throw it on Greek yogurt with some granola (best breakfast hack ever).
- If you’re craving something cool, a few chocolate chips on top will melt into gooey magic.
So next time you’re bored with the same old breakfast, give Baked Protein Pancake Bowls a spin. And hey, there’s more breakfast inspiration like banana blueberry baked oatmeal and fun ideas on the site if you’re feeling stuck.
You won’t find them in a five-star restaurant, but you’ll wish you could. If you want even more ideas, hop over to this helpful post I found: Baked Protein Pancake Bowls- great for meal prep and no banana … for another take—seriously, worth the click if you love easy meal prep!
Baked Protein Pancake Bowls
Baked Protein Pancake Bowls
Ingredients
Method
- Preheat your oven to 350°F (175°C).
- Spray your bowls or muffin tin with non-stick spray.
- In a large mixing bowl, combine the oats, protein powder, baking powder, cinnamon, and salt.
- In a separate bowl, whisk together the milk, eggs, and maple syrup or honey.
- Add the wet ingredients to the dry ingredients and mix until combined.
- Fold in any additional ingredients or toppings desired.
- Pour the batter into the prepared bowls or muffin tin.
- Bake for 18-22 minutes, until a toothpick comes out mostly clean.
- Remove from the oven and let cool slightly before serving.