Crispy and Delicious Air Fryer Chicken Kiev You’ll Crave!
Air Fryer Chicken Kiev. If you just sighed, trust me, you’re not alone. There’s just something intimidating about making a “fancy” dish like this at home. Maybe you’ve had one of those moments—glaring at a half-frozen chunk in your freezer, or eyeing that pack of chicken breasts thinking, “Do I really need a crusty mess and a bathtub of oil?

” Well, the air fryer has swooped in and saved the day for folks like us who want crispy, juicy, and easy Chicken Kiev. No more oil splatters, and yes, you get all that gooey buttery center. Your kitchen stays chill (and not smelling like a fast-food joint). Sound promising? Let’s dive in.
Air Fryer Chicken Kiev
What is Chicken Kiev?
Chicken Kiev is…well, practically a legend in the comfort food world. You start with chicken breast, but—hang on, not boring grilled. Nope. You stuff it with garlic herb butter, then bread and fry (or in our modern case, air fry) that baby until it’s golden outside and crazy juicy inside. First time I tried making this, I nearly wept when I sliced in and butter spilled out. Seriously, it’s like the best stuffed chicken you never knew you needed.
Some folks say Chicken Kiev’s got Russian or Ukrainian roots—doesn’t matter to me. I just think of it as the kind of thing you splurge on at a “five-star” restaurant but now you can whip up at home, pyjamas and all.
Air Fryer Chicken Kiev
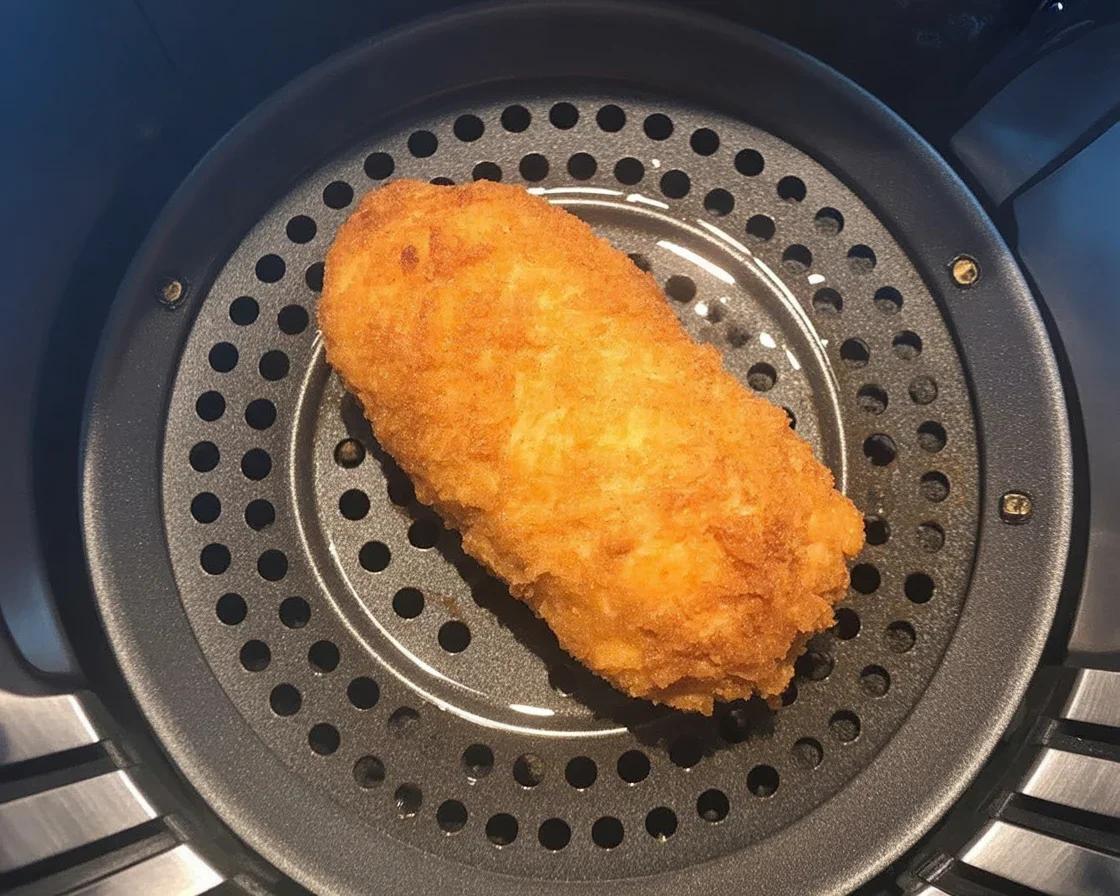
How to Cook Frozen Chicken Kiev in the Air Fryer
Okay, here’s my confession—I don’t always make Chicken Kiev from scratch. Sometimes you just grab those store-bought frozen ones, right? Here’s what you do. Set the air fryer at 180°C (that’s 360°F for the non-metric crew). Give it three minutes to heat up.
Pop those frozen Chicken Kiev in the basket. Try not to squish them together, otherwise they stick and you’ll cuss. Cook for 18-22 minutes. Flip halfway (use tongs, trust me, butter hot as lava). The outside gets crisp and gold, and the inside—yep, that famous melting butter. Pro tip: let them rest three minutes before cutting. That way, the filling stays put instead of flooding your plate.
Once, I was in a rush and skipped the rest time. Big mistake—ended up with butter puddles everywhere. And my kid asked if we were eating “dipping chicken.” Not my proudest moment.
“Tried your air fryer Chicken Kiev hack last weekend—honestly, didn’t think it would work! Came out super crispy. Husband was shocked (we usually ruin frozen stuff). Thanks for saving dinner!” —Kelsey from Indiana
Air Fryer Chicken Kiev
Cooking Tips
I’ve botched this enough times to know a mistake when I see one. First, always grab good boneless chicken breasts. Thin ones dry out, thick ones are better (but even out with a rolling pin if some are thicc). The secret to holding in that delicious butter? Seal edges really well—I mean, pinch ‘em till your fingers hurt.
Don’t let the air fryer basket get overcrowded. Air needs room to work its magic. Also, line with parchment or spray oil if you hate clean-up like I do. Check doneness with a quick-cut—if juices are pink, shove ‘em in for a few minutes longer. Butter leaks out sometimes. Don’t sweat it. It still tastes amazing even if it’s messy (trust me, I have lived it).
Also—I know folks say “don’t open the air fryer!” but you’re not making soufflé. Peek if you’re nervous. That crust should look deep brown, not sad beige.
Air Fryer Chicken Kiev
What to Serve with Air Fryer Chicken Kiev
Wondering what to pile next to your crispy, buttery air fryer Chicken Kiev? Nothing too fancy needed. Here’s how we do it—simple, no fuss:
- Tossed green salad with lemon dressing (super fresh with that rich chicken)
- Creamy mashed potatoes, duh—soak up that herby butter
- Steamed green beans or broccoli (let’s call it balance)
- Crusty bread for sopping up any runaway butter
Whenever I plate these up with a salad and buttery potatoes, the whole crew parks at the table fast. Trust me, you’ll want extra napkins. (I probably should have warned my brother not to eat it over the carpet. Oops.)
Air Fryer Chicken Kiev
Making Them
Making air fryer Chicken Kiev from scratch isn’t rocket science, but it does need a bit of patience. Softened butter gets mixed with fresh parsley, chopped garlic, plus a pinch of salt (and pepper—can’t lie, I sometimes add dill if I’m feeling wild).
Stick it in the fridge to harden up while you flatten and prep the chicken breasts. Butterfly them, then layer in a hunk of your flavored butter. Roll ‘em tight, tuck those ends in, then coat in flour, dip in beaten egg, and finally dredge in breadcrumbs.
Now, preheat your air fryer. Spritz or brush the Kiev with a bit of oil for max crispiness. Set in the basket and cook at 180°C (360°F) for 18-22 minutes. Flip after 10 minutes if you like, but honestly, you’re just looking for golden crunch and clear juices. Let ‘em rest before serving—that gooey butter center is pure gold and should be savored.
Air Fryer Chicken Kiev
Feels like a cheat code for family dinners. If you’ve got leftovers? Cold Chicken Kiev is awesome for next-day sandwiches. I swear, it rivals any deli chicken I’ve ever eaten.

Air Fryer Chicken Kiev

A crispy, juicy air fryer version of the classic Chicken Kiev, stuffed with garlic herb butter and cooked to perfection.
- Prep Time: 15 minutes
- Cook Time: 22 minutes
- Total Time: 37 minutes
- Yield: 4 servings 1x
- Category: Main Course
- Method: Air Frying
- Cuisine: American
- Diet: Gluten-Free (when using gluten-free flour and breadcrumbs)
Ingredients
- 4 boneless chicken breasts
- 1/2 cup unsalted butter, softened
- 2 tablespoons fresh parsley, chopped
- 2 cloves garlic, minced
- Salt and pepper to taste
- 1/4 cup all-purpose flour
- 1 large egg, beaten
- 1 cup breadcrumbs
Instructions
- Mix softened butter with parsley, garlic, salt, and pepper. Refrigerate until firm.
- Butterfly the chicken breasts and place a hunk of flavored butter inside each. Roll tightly and tuck in the ends.
- Coat each chicken roll in flour, dip in beaten egg, and dredge in breadcrumbs.
- Preheat air fryer to 180°C (360°F).
- Spritz or brush the Kiev with oil for extra crispiness.
- Place in the air fryer basket and cook for 18-22 minutes, flipping halfway through, until golden brown and juices run clear.
- Let rest for 3 minutes before serving.
Notes
Make sure to seal the edges well to keep the butter inside. If there are pink juices, cook a few minutes longer.
Nutrition
- Serving Size: 1 serving
- Calories: 400
- Sugar: 1g
- Sodium: 600mg
- Fat: 20g
- Saturated Fat: 10g
- Unsaturated Fat: 8g
- Trans Fat: 0g
- Carbohydrates: 30g
- Fiber: 2g
- Protein: 25g
- Cholesterol: 120mg

Air Fryer Chicken Kiev
Ingredients
Method
- Mix softened butter with parsley, garlic, salt, and pepper. Refrigerate until firm.
- Butterfly the chicken breasts and place a hunk of flavored butter inside each. Roll tightly and tuck in the ends.
- Coat each chicken roll in flour, dip in beaten egg, and dredge in breadcrumbs.
- Preheat air fryer to 180°C (360°F).
- Spritz or brush the Kiev with oil for extra crispiness.
- Place in the air fryer basket and cook for 18-22 minutes, flipping halfway through, until golden brown and juices run clear.
- Let rest for 3 minutes before serving.