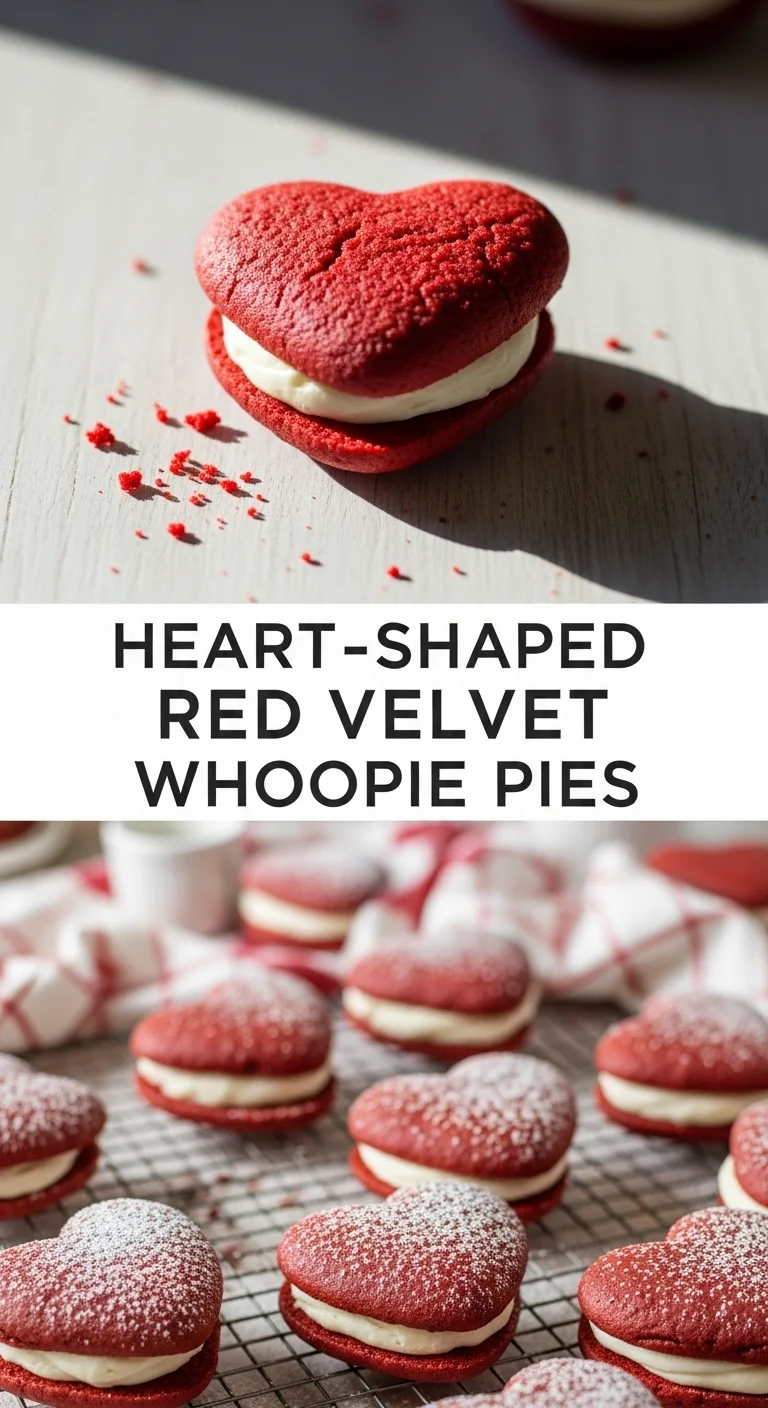
Heart-Shaped Red Velvet Whoopie Pies: 7 Delicious Secrets to Baking the Ultimate Valentine’s Treat
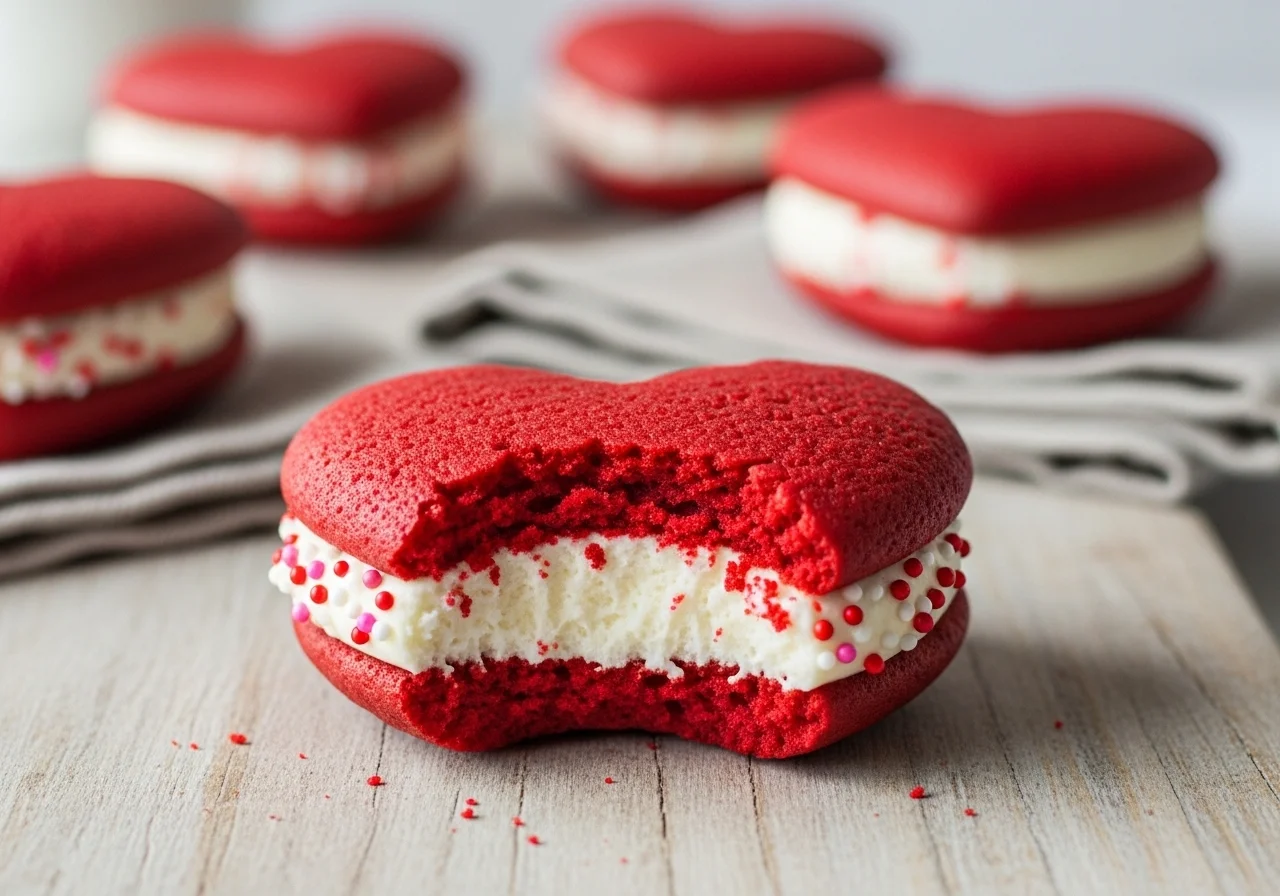
Heart-Shaped Red Velvet Whoopie Pies are more than just a dessert; they’re a tiny, edible hug, especially when crafted for Valentine’s Day. Here at Helthrecipe, we believe that baking with love transforms simple ingredients into unforgettable memories.
If you’ve ever dreamt of creating a show-stopping treat that whispers sweet nothings, you’ve landed in the right spot. Get ready to charm your sweetheart, friends, or family with these delightful Heart-Shaped Red Velvet Whoopie Pies, a true red velvet dessert recipe that’s sure to steal hearts.

What exactly makes Heart-Shaped Red Velvet Whoopie Pies so irresistibly charming?
The Allure of Red Velvet: A Classic Love Story
Red velvet cake, with its striking crimson hue and subtle cocoa notes, has long been associated with romance and indulgence. It’s a flavor that feels both classic and celebratory, making Heart-Shaped Red Velvet Whoopie Pies an instant hit for any special occasion. This iconic color, traditionally achieved with a dash of cocoa and red food coloring, truly sets these treats apart.
Whoopie Pies: A Nostalgic Twist on a Cookie
Think of a whoopie pie as a soft, cake-like cookie sandwich, but elevated. Unlike a traditional cookie, whoopie pies boast a delightful chewiness and a pillowy texture that perfectly cradles a creamy filling. The charm of Heart-Shaped Red Velvet Whoopie Pies lies in this comforting, nostalgic form, making them far more interesting than a simple biscuit.
The Magic of the Heart Shape for Valentine’s Day
For Valentine’s Day baking, presentation is everything, and the heart shape speaks volumes. It instantly conveys affection and care, turning a delicious treat into a heartfelt gesture. Crafting Heart-Shaped Red Velvet Whoopie Pies shows an extra touch of thoughtfulness, making them an ideal gift or a centerpiece for your romantic dinner. You can even explore other romantic treats like Heart-Shaped Macarons for more inspiration.
Why This Red Velvet Dessert Recipe Stands Out
This isn’t just any red velvet dessert recipe; it’s specifically designed for homemade whoopie pies, ensuring each bite delivers a perfect balance of moist cake and tangy cream cheese filling. The elegance and simplicity of Heart-Shaped Red Velvet Whoopie Pies make them stand out from the usual holiday cookie ideas, offering a fresh, exciting option.
Which essential ingredients and tools do you need to bake perfect Whoopie Pies?
Gathering Your Red Velvet Essentials
To create truly spectacular Heart-Shaped Red Velvet Whoopie Pies, you’ll need quality ingredients. Think unsweetened cocoa powder, buttermilk, apple cider vinegar, and good quality red food coloring. These components work in harmony to give the cakes their signature color and tender crumb. Don’t skimp on the vanilla extract; it elevates the flavor profile of your red velvet dessert recipe.
The Cream Cheese Filling Dream Team
The heart of any whoopie pie is its filling, and for Heart-Shaped Red Velvet Whoopie Pies, a classic cream cheese filling is non-negotiable. You’ll need full-fat cream cheese, unsalted butter, powdered sugar, and a splash of vanilla. Ensure your butter and cream cheese are at room temperature for a lump-free, luscious whoopie pie frosting.
Must-Have Baking Tools for Heart-Shaped Treats
Beyond your standard mixing bowls and whisks, a few specialized tools will make baking heart-shaped treats a breeze. A piping bag with a round tip is essential for forming those neat heart shapes. Parchment paper, baking sheets, and a good quality electric mixer will also be your best friends when making Heart-Shaped Red Velvet Whoopie Pies. Precision is key for uniform results.
Quality Ingredients Make the Difference
As the famous chef Julia Child once said, “You don’t have to cook fancy or complicated masterpieces – just good food from fresh ingredients.” This holds true for Heart-Shaped Red Velvet Whoopie Pies. Using fresh, high-quality ingredients ensures a superior flavor and texture that will truly impress.
How can you master the art of baking and assembling these delightful heart-shaped treats?
Perfecting the Whoopie Pie Batter
The secret to moist whoopie pie cakes for your Heart-Shaped Red Velvet Whoopie Pies lies in not overmixing the batter. Mix just until combined; a little lumpiness is okay. Overmixing develops too much gluten, leading to tough cakes. Follow the red velvet dessert recipe carefully for the perfect consistency.
Piping Pretty Heart-Shaped Cakes
For uniform Heart-Shaped Red Velvet Whoopie Pies, use a piping bag. Draw heart outlines on your parchment paper first, then flip it over. This acts as a guide, ensuring each cake is roughly the same size and shape. Pipe the batter steadily, aiming for consistent thickness. This step is crucial for baking heart-shaped treats that look professional.
Crafting the Silky Whoopie Pie Frosting
Achieving that perfect, fluffy whoopie pie frosting for your Heart-Shaped Red Velvet Whoopie Pies means beating the butter and cream cheese until light and airy before adding the powdered sugar. Gradually add the sugar, scraping down the bowl frequently. This ensures a smooth, luscious cream cheese filling without any graininess.
Assembling Your Homemade Whoopie Pies with Flair
Once your cake halves are cool, it’s time to assemble your homemade whoopie pies. Pipe a generous dollop of cream cheese filling onto the flat side of one heart, then gently top with another heart. Don’t press too hard, or the filling will squish out. These Heart-Shaped Red Velvet Whoopie Pies are meant to be plump and inviting.
What are the secret tips for achieving moist cakes and luscious fillings every time?
The Buttermilk and Vinegar Advantage
The acidity in buttermilk and apple cider vinegar reacts with the baking soda, creating a tender, moist crumb in your Heart-Shaped Red Velvet Whoopie Pies. Don’t skip these ingredients! They are fundamental to the classic red velvet dessert recipe and contribute to the cake’s signature texture and slight tang. This is a key secret for truly exceptional holiday cookie ideas.
Don’t Overmix for Tender Cakes
We can’t stress this enough: overmixing is the enemy of tender cakes. Once the dry ingredients are added to your Heart-Shaped Red Velvet Whoopie Pies batter, mix just until no streaks of flour remain. A light hand here ensures your whoopie pies are soft and delicate, never tough or dry. This tip applies to all baking heart-shaped treats.
Chilling is Key for Cream Cheese Filling Stability
After making your whoopie pie frosting, a quick chill in the fridge (about 15-20 minutes) can do wonders. This firms up the cream cheese filling, making it easier to pipe and less likely to ooze out when assembling your Heart-Shaped Red Velvet Whoopie Pies. A stable filling is a happy filling, especially for homemade whoopie pies.
The Art of Storing Your Holiday Cookie Ideas
To keep your Heart-Shaped Red Velvet Whoopie Pies fresh, store them in an airtight container in the refrigerator. The cream cheese filling requires chilling, and the cakes will stay moist for several days. Bring them to room temperature for about 15-20 minutes before serving for the best flavor and texture.
When is the perfect occasion to serve your stunning Heart-Shaped Red Velvet Whoopie Pies?
Valentine’s Day: The Obvious Choice
Naturally, Valentine’s Day is the prime time for Heart-Shaped Red Velvet Whoopie Pies. They make an incredibly thoughtful and delicious gift for your beloved, or a delightful treat to share with family. Imagine presenting these beautiful red velvet dessert recipe creations – they’re guaranteed to bring smiles and warm hearts. Consider pairing them with Easy Valentine’s Day Chocolate Bark for a truly impressive spread.
Beyond February 14th: Spreading Love Year-Round
While perfect for Valentine’s Day baking, don’t limit your Heart-Shaped Red Velvet Whoopie Pies to just one day a year! They’re fantastic for anniversaries, birthdays, or simply as a special treat to brighten someone’s day. Any moment that calls for a touch of sweetness and charm is an ideal occasion for these homemade whoopie pies.
Gift-Giving with Heart-Shaped Red Velvet Whoopie Pies
Packaging these delightful Heart-Shaped Red Velvet Whoopie Pies in a pretty box or cellophane bag tied with a ribbon transforms them into an exquisite homemade gift. They show you’ve put in effort and love, far more personal than anything store-bought. These make fantastic holiday cookie ideas for any gifting event.
Pairing Your Red Velvet Dessert Recipe with Drinks
Heart-Shaped Red Velvet Whoopie Pies pair beautifully with a variety of beverages. Try them with a cold glass of milk, a warm cup of coffee, or even a sparkling rosé for a more elegant touch. The rich, tangy cream cheese filling complements these drinks wonderfully, enhancing the overall experience of this red velvet dessert recipe. For more holiday baking ideas and treats, visit Helthrecipe.
Key Takeaways
- Heart-Shaped Red Velvet Whoopie Pies are a charming, memorable treat for Valentine’s Day and beyond.
- Use quality ingredients like buttermilk and cream cheese for the best results.
- Master the piping technique for perfectly shaped cakes and a luscious whoopie pie frosting.
- Avoid overmixing the batter to ensure moist, tender cakes every time.
- Don’t forget to chill your cream cheese filling for easier assembly and stability.
- These delightful homemade whoopie pies make excellent gifts and holiday cookie ideas.
- Store your Heart-Shaped Red Velvet Whoopie Pies properly in the fridge to maintain freshness.

Heart-Shaped Red Velvet Whoopie Pies
Ingredients
Method
- Preheat your oven to 350°F (175°C) and line baking sheets with parchment paper.
- In a mixing bowl, combine the flour, baking soda, cocoa powder, and salt. Set aside.
- In another bowl, cream together the softened butter and granulated sugar until light and fluffy.
- Add the egg, buttermilk, vinegar, vanilla extract, and red food coloring to the butter mixture. Mix until combined.
- Gradually mix in the dry ingredients until just combined. Be careful not to overmix.
- Using a piping bag, pipe heart-shaped dollops of batter onto the prepared baking sheets.
- Bake for 10-12 minutes or until the cakes spring back when gently pressed. Allow to cool.
- In a mixing bowl, beat the cream cheese and butter together until smooth.
- Gradually add powdered sugar and continue to mix until fully combined and fluffy.
- Once cakes are cool, pipe a generous amount of cream cheese filling onto the flat side of one cake.
- Top with another cake and gently press together. Repeat with remaining cakes.