Freshly baked Blueberry Butter Swim Biscuits with a crunchy top and juicy blueberries.

Blueberry Butter Swim Biscuits

Blueberry Butter Swim Biscuits. Ever heard of them? If not, let me tell you: you know those mornings when you want something warm and crumbly, but the idea of kneading dough makes you want to eat cold cereal instead?

That’s exactly the kind of day that made me stumble onto this recipe. Trust me, these biscuits fix that problem faster than I can say “where’s the butter?”. It’s just…mix, pour, bake, eat. No fussing around. If you love blueberries or even just butter, buckle up because this could become your new go-to.

Blueberry Butter Swim Biscuits

What Are Blueberry Butter Swim Biscuits?

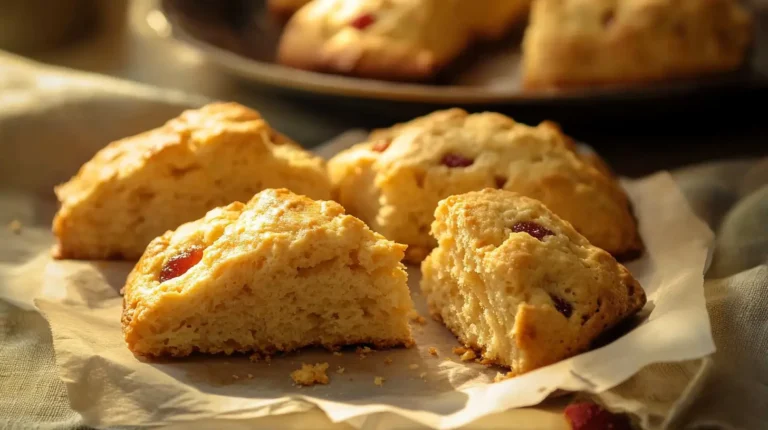
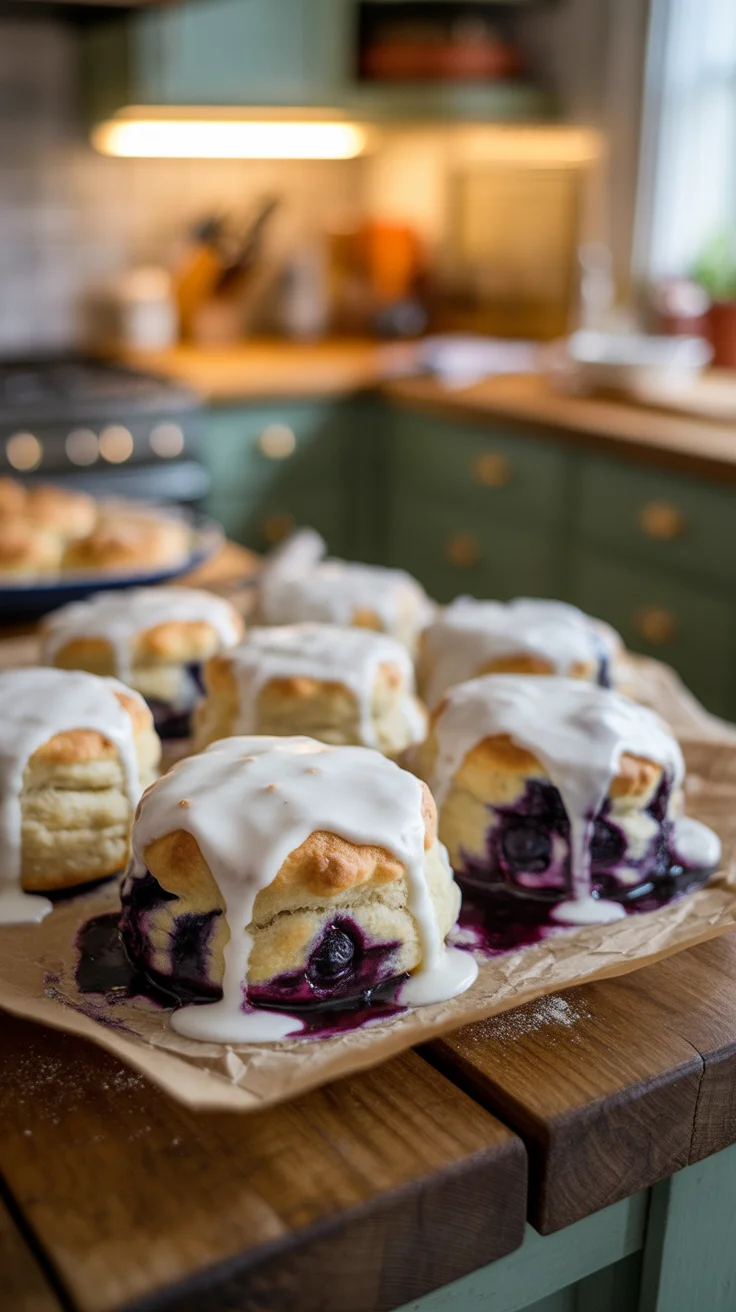
Blueberry Butter Swim Biscuits are one of those rare treats that taste like blueberry-studded magic and feel like a cheat code for home baking. They’re called “swim biscuits” because you literally let the dough swim around in a puddle of melted butter in your baking dish. Weird? Maybe. Delicious? Absolutely. The magic, though, comes with how simple these are. There’s no biscuit cutter, no mess, just a bowl, a baking pan, and maybe a whisk if you’re feeling fancy. They’ve got a crispy, buttery edge and a fluffy middle with juicy pops of blueberry. Saying these are better than any boxed mix—okay, that’s my opinion, but I stand by it. If I can make them on a sleepy Saturday, so can you.

“I never thought I could bake something this good. These biscuits made my kitchen smell like a five-star bakery. My kids ate almost the whole pan before lunch.” – Jamie R.

Ingredients You’ll Need

Okay, here’s all you really need for Blueberry Butter Swim Biscuits. Let’s keep it real: there’s probably nothing wild in this list, hopefully stuff you’ve got already hiding in your kitchen.

  • All-purpose flour (regular old flour, nothing fancy)
  • Baking powder (not baking soda, don’t mix ’em up, I made that mistake once)
  • Sugar (just enough to give things a boost)
  • Salt
  • Milk (any kind, really, but I use whole milk for a richer flavor)
  • Unsalted butter (you want a lot… don’t judge)
  • Fresh blueberries (or frozen, don’t sweat it if that’s what you have)

You don’t need any electric gear or secret ingredients here—just grab your biggest bowl and let’s get things moving.

How To Make Blueberry Butter Swim Biscuits

Making these is about as simple as pouring cereal, honestly. First, grab an 8×8 or 9×9 baking dish. Melt your butter right in there (let the microwave work for you), then just let it hang out while you put everything else together. Next, mix your dry ingredients—flour, baking powder, sugar, and salt—in one bowl. Pour in the milk, give it a quick mix (it’ll be sticky, don’t worry), then gently fold in those blueberries. Try not to mash ’em, unless you’re into smurf-colored biscuits.

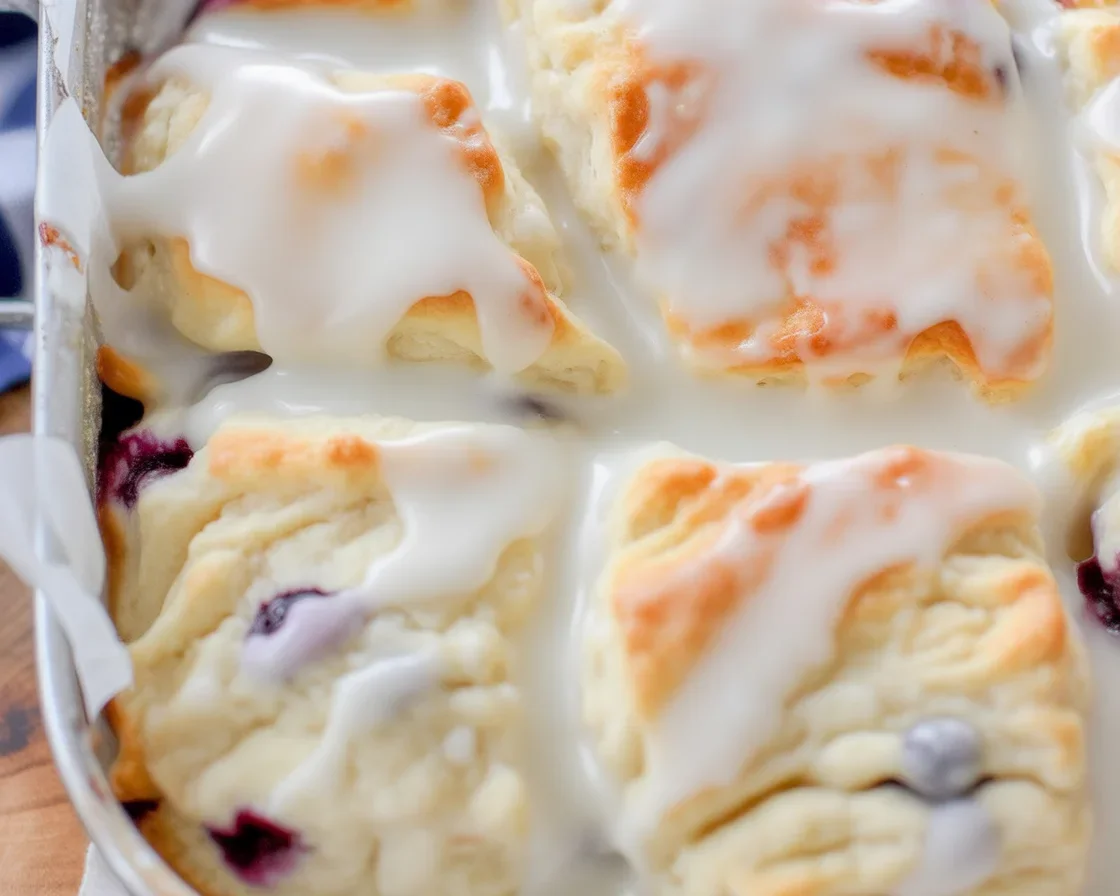
Scrape all that goodness right into the butter pool in your dish. I know, it’s gonna look weird and, honestly, like a kitchen fail. Trust the process. Bake it in a hot oven (usually 450°F) for about 25-30 minutes until it smells, well, irresistible and starts to get brown edges.

Pull it out, let it cool just a tiny bit (hot butter is sneaky), and then cut big, messy squares. Eat right away. Leftovers make a killer snack, too.

Serving Suggestions for Blueberry Butter Swim Biscuits

Alright, some quick bullet points because honestly, there isn’t much you can’t do with these:

  • Serve hot with extra butter or a drizzle of honey for a sweet breakfast
  • Add a dollop of whipped cream or yogurt if you’re feeling kinda brunchy
  • Pack a couple for a snack on-the-go (they travel way better than most muffins)
  • Sneak leftovers for dessert with a little vanilla ice cream (no shame, I do it too)

Tips & Troubleshooting for Blueberry Butter Swim Biscuits

If your biscuits come out a little dense, that probably means the batter was overmixed. Try to just fold until things are mostly together—lumps are your friend here, I promise. Blueberries sinking to the bottom? Toss them in a tiny bit of extra flour first, and boom, problem solved.

Now, if your top’s not getting brown, just let it sit under the broiler for a minute, but watch close, because they turn fast. And if you’re using frozen berries, don’t even bother thawing—just toss them in frozen.

Last thing, don’t skimp on the butter. These are literally called Butter Swim Biscuits for a reason, ha.

Final Thoughts: Bake These Already!

Okay, so I’m not saying Blueberry Butter Swim Biscuits will change your life, but honestly, they might make your mornings about fifteen times better. They’re as easy as breakfast gets, and, wow, do they taste homemade—somehow even if you’re half-awake. Try them once and tell me you don’t want to make them every weekend. If you’re nervous, check out Sally’s Baking Addiction for some solid baking basics or King Arthur Baking for flour tips. Go on, give them a shot and let me know if your family doesn’t devour the whole pan.

Blueberry Butter Swim Biscuits

Print

Blueberry Butter Swim Biscuits

Delicious blueberry biscuits that swim in melted butter, offering a crispy edge and fluffy center.

  • Author: asouhailkikogmail-com
  • Prep Time: 10 minutes
  • Cook Time: 30 minutes
  • Total Time: 40 minutes
  • Yield: 8 servings 1x
  • Category: Breakfast
  • Method: Baking
  • Cuisine: American
  • Diet: Vegetarian

Ingredients

Scale
  • 2 cups all-purpose flour
  • 2 tsp baking powder
  • 1/4 cup sugar
  • 1/2 tsp salt
  • 1 cup milk (whole recommended)
  • 1/2 cup unsalted butter (melted)
  • 1 cup fresh or frozen blueberries

Instructions

  1. Preheat your oven to 450°F (230°C) and prepare an 8×8 or 9×9 baking dish.
  2. Melt the butter in the baking dish.
  3. In a separate bowl, mix together the flour, baking powder, sugar, and salt.
  4. Add the milk to the dry ingredients and mix gently until just combined, being careful not to overmix.
  5. Fold in the blueberries.
  6. Pour the mixture into the melted butter in the baking dish.
  7. Bake for 25-30 minutes or until the edges are golden brown and the biscuits smell irresistible.
  8. Let cool slightly, then cut into squares and serve warm.

Notes

For added sweetness, serve with extra butter or a drizzle of honey. These biscuits also pair well with yogurt or whipped cream.

Nutrition

  • Serving Size: 1 biscuit
  • Calories: 250
  • Sugar: 6g
  • Sodium: 200mg
  • Fat: 14g
  • Saturated Fat: 8g
  • Unsaturated Fat: 6g
  • Trans Fat: 0g
  • Carbohydrates: 30g
  • Fiber: 1g
  • Protein: 4g
  • Cholesterol: 30mg

Did you make this recipe?

Share a photo and tag us — we can't wait to see what you've made!


Blueberry Butter Swim Biscuits

Delicious blueberry biscuits that swim in melted butter, offering a crispy edge and fluffy center.
Prep Time 10 minutes
Cook Time 30 minutes
Total Time 40 minutes
Servings: 8 servings
Course: Breakfast
Cuisine: American
Calories: 250

Ingredients
  

Dry Ingredients
  • 2 cups all-purpose flour regular old flour, nothing fancy
  • 2 tsp baking powder not baking soda, don’t mix ’em up
  • 1/4 cup sugar just enough to give things a boost
  • 1/2 tsp salt
Wet Ingredients
  • 1 cup milk (whole recommended for a richer flavor)
  • 1/2 cup unsalted butter melted, you want a lot
Add-ins
  • 1 cup fresh or frozen blueberries don’t sweat it if that’s what you have

Method
 

Preparation
  1. Preheat your oven to 450°F (230°C) and prepare an 8x8 or 9x9 baking dish.
  2. Melt the butter in the baking dish.
  3. In a separate bowl, mix together the flour, baking powder, sugar, and salt.
  4. Add the milk to the dry ingredients and mix gently until just combined, being careful not to overmix.
  5. Fold in the blueberries.
Baking
  1. Pour the mixture into the melted butter in the baking dish.
  2. Bake for 25-30 minutes or until the edges are golden brown and the biscuits smell irresistible.
  3. Let cool slightly, then cut into squares and serve warm.

Notes

For added sweetness, serve with extra butter or a drizzle of honey. These biscuits also pair well with yogurt or whipped cream. If your biscuits come out a little dense, just fold until things are mostly together—lumps are your friend. If using frozen berries, just toss them in frozen without thawing.

Similar Posts

  • healthy Orange Scones

    Why You’ll Fall for These Orange Scones The Simple Ingredients You Actually Need Step-By-Step: Bringing Orange Scones to Life Serving Suggestions To Level Up Common Questions Go On, Make Your Mornings Way Less Boring Orange Scones are kinda magical when you want something quick for breakfast, but also wanna trick your brain into thinking you’re at a five-star restaurant. Ever drag yourself outta bed and just want a treat to make the day less… meh? Yep, been there. I actually started making these because regular scones got way too boring and, okay, my neighbor wouldn’t stop bragging about her “famous” lemon version. Orange scones hit different. Seriously, that citrusy thing going on is just—wow. If you’re tired of sad donuts or cold cereal, let’s get you sorted out right here.   this … Why You’ll Fall for These Orange Scones Listen, nobody wants a dry, crumbly brick on the plate. The whole idea is to get a scone that’s bright and soft on the inside, with just a hint of gold crunch outside. These orange scones are super easy, too. I’m not just saying that—real talk, my thirteen-year-old cousin bakes them without setting off the smoke alarm. You don’t need a mixer. You don’t even need fancy tools. Mixing with your hands is cool (honestly, it’s kinda therapeutic). The burst of orange makes the kitchen smell like living inside a fruit basket. Sometimes I toss in a handful of chocolate chips, but don’t tell the purists. Go wild with the zest. I always say, “More zest, more best!” There’s science somewhere about citrus making you happy—I say just trust the process.   The Simple Ingredients You Actually Need Here’s the best part: most of this stuff’s already hanging out in your kitchen right now. Really. You’ll need: All-purpose flour—yep, nothing fancy Cold butter (don’t you dare soften it) White sugar and a little pinch of salt (don’t skip this) A juicy orange (zest and juice both, please) Milk or cream (either’s fine—don’t overthink) Baking powder for the puff Maybe an egg, if you’re feelin’ extra Mix this all up and try not to eat the dough raw. Old habits die hard.   Step-By-Step: Bringing Orange Scones to Life First thing, crank up your oven. You want it hot—about 400°F. While it’s preheating, grab a big bowl. Dump in your flour, sugar, baking powder, and salt. Now toss those cold, cubed butter pieces in. Cut them in with your fingers or a pastry cutter, and don’t stress if a few chunks are bigger. Grate in all that lovely orange zest (seriously, let’s not be stingy). Pour in juice and milk (I splash both instead of measuring). If you’re using an egg, whisk and add now. Stir until just combined. Don’t you dare overmix. Plop dough on a floured counter, pat into a messy round disk (about an inch thick), and slice it like a pizza. The rougher the cut, the more rustic and bakery-looking. Set on a sheet lined with parchment. Brush tops with more milk (makes ’em golden). Bake 13-15 minutes till just lightly brown. Let cool for a hot second before eating so you don’t burn your tongue (again… it happens, trust me).   Serving Suggestions To Level Up Top with orange glaze or drizzle with melted chocolate if feeling snazzy. Serve warm with real butter—never margarine, come on now. Toss leftovers in the toaster next morning for a crispy redo. Pair with strong coffee or black tea to cut the sweetness. Common Questions Can I make orange scones ahead of time? Absolutely! I usually bake extra and freeze a few. Just let ’em cool first, then wrap tight. Reheat in oven for a just-baked feel. What if I only have mandarins or clementines? No problem. Go for it. The flavor will be a titch sweeter, but honestly, you might like that better. How do I stop them from being too dry? Don’t overmix the dough and make sure your butter is cold. A little drizzle of extra cream on top before baking never hurts. Do I need a glaze? Nope! I’m team “depends on my mood.” Sometimes a broken scone and a pat of butter is all you need. But a simple orange-powdered sugar glaze makes them café-level. Can I use store-bought orange juice? Eh. Sure, if you’re in a pinch. But fresh is way, way better. You’ll notice the zing. I’ve tried probably fifteen recipes, but this one? Perfection. My husband asked if I bought them from that expensive bakery down the street. Nope, just my own two hands! – Dani M., Vermont…

  • Banana Blueberry Baked Oatmeal

      Why I’m Obsessed with Banana Blueberry Baked Oatmeal What You’ll Need For Banana Blueberry Baked Oatmeal How To Make It — My No-Stress Steps Serving Suggestions: How I Make Mine Extra Table: Quick Stats & Need-to-Know Facts Real People Love It Common Questions A Breakfast Worth Waking Up For Ever wake up craving breakfast that’s healthy but also feels a little extra? Banana Blueberry Baked Oatmeal totally gets the job done. You get this cozy, fruity hit from bananas and blueberries, but also big-time oats to keep you full. Oh, and it’s crazy easy to throw together. Like, you could probably make it half-awake (speaking from experience). This recipe saved me on busy mornings more times than I’d admit.   Why I’m Obsessed with Banana Blueberry Baked Oatmeal I honestly didn’t mean to fall in love with Banana Blueberry Baked Oatmeal. At first, I just wanted something I could meal-prep and microwave later—because who has time to cook fresh every day? Then I tasted it. Wow. The bananas get all caramel-y and sweet, almost like dessert. The blueberries pop (sometimes literally) and make everything juicy. That combo feels fancy but trust me, it’s the total opposite of high-maintenance. Make it for brunch, make it for weekday breakfast, even take it on picnics—this stuff is like a breakfast Swiss Army knife. I’ve made it so many times I eyeball the ingredients now. Honestly, my kids fight over the last piece. That’s when you know it’s good. What You’ll Need For Banana Blueberry Baked Oatmeal Okay, here’s what goes in it. I keep these ingredients stocked now, since Banana Blueberry Baked Oatmeal is a regular ask: Rolled oats: Old-fashioned ones work best Overripe bananas: Like, practically brown. The mushier, the better Fresh or frozen blueberries: Both do the trick Milk (dairy or not, your call) Eggs A splash of vanilla Some maple syrup (or honey) Baking powder Cinnamon, if you’re fancy Pinch of salt Toss all that in, and you’re basically guaranteed breakfast success. How To Make It — My No-Stress Steps I’ll be real: even if you mess up, Banana Blueberry Baked Oatmeal kinda forgives you. Here’s how I do it: First, mash your bananas in a big bowl. It’ll look messy. That’s fine. Whisk in the eggs, milk, maple syrup, and vanilla until you have a gloppy (kinda gross-looking, but trust me) soup. Dump in the oats, cinnamon, baking powder, and salt. Stir well—really scrape that bowl. Fold in the blueberries. If some of them smash, that’s even better. Swirly blue streaks look cool. Pour this into a greased baking dish. I like mine deep (for thick slices). Bake until the top looks a little golden and the middle isn’t wobbly. Usually about 35 minutes, but check your oven—it has a mind of its own sometimes. Let it cool a bit unless you enjoy burning your tongue (I never learn). Serving Suggestions: How I Make Mine Extra Drizzle extra maple syrup on top. Because, duh. Dollop some Greek yogurt or whipped cream on your Slice if you’re feeling wild. Have it cold from the fridge or warmed up in the microwave—the texture is different but good both ways. Toss on some chopped nuts for crunch (pecans make it feel five-star restaurant level).   Table: Quick Stats & Need-to-Know Facts Here’s a super simple look at Banana Blueberry Baked Oatmeal: Aspect Detail Why It Matters Tips Prep Time 10 minutes Super quick, even on Mondays Mash bananas ahead Bake Time 35 minutes Hands-off; tidy up while it bakes Use toothpick to check doneness Servings 6-8…

  • Fluffy Japanese Soufflé Pancakes

    Japanese Soufflé Pancakes. I probably don’t need to explain why you’re here – you’ve seen these fluffy, sky-high beauties bouncing around online, right? I mean, these pancakes are so thick, it’s almost unfair to call them pancakes. Maybe you’ve tried regular ones, even my usual go-to Blueberry Flax Pancakes (recipe’s here if you’re curious), but…

  • Healthy Peanut Butter Greek Yogurt Banana Bread Muffins

    What Makes These Muffins Healthy Anyway? How to Make Healthy Peanut Butter Greek Yogurt Banana Bread Muffins Serving Suggestions Real Results: A Quick Table for Muffin Nerds Common Questions Give These Muffins a Shot (Seriously) Ever find yourself standing in the kitchen, bananas going mushy on the counter, trying to talk yourself out of just tossing them? Me too. Enter my go-to hero: Healthy Peanut Butter Greek Yogurt Banana Bread Muffins. These are what I grab when I want something a little sweet, a little wholesome, and—bonus points—they actually fill you up without that sugar crash. They’re just different enough to keep breakfast (or, let’s be real, midnight snacking) from getting boring. These muffins nail that perfect balance of soft, nutty, and satisfying. No more staring at sad bananas wishing for a miracle. Here it is.   What Makes These Muffins Healthy Anyway? People always ask if a muffin can be healthy. Yes, absolutely, these are not your run-of-the-mill, cake-in-disguise muffins. The trick is in the swap outs. Instead of using a pile of butter, I mix in creamy Greek yogurt for that soft texture. Not only does it keep these muffins moist (I mean, who likes dry muffins?), it packs in a little protein too. Peanut butter… I’m obsessed, and it brings healthy fats that do more than just taste good. I’ll be honest, keeping the sugar low here makes me feel pretty smug. The ripe bananas do most of the sweet talking. And hey, you’re getting fiber from whole wheat flour if you want to take it up a notch. This is the kind of snack that isn’t gonna wreck your day but actually makes breakfast feel like you’re doing something good for yourself.   How to Make Healthy Peanut Butter Greek Yogurt Banana Bread Muffins You won’t need anything fancy here. I usually grab two bowls—one for dry, one for wet—and that’s about it. Mash up your bananas (the browner, the better. I’m weirdly proud when mine look almost scary). Stir the Greek yogurt, peanut butter, and a splash of vanilla into the banana, then mix your flour and the usual baking essentials together in a different bowl. Pour the wet stuff into the dry and combine just until you can’t see flour. Please, trust me, do not over-mix. That’s how you get rubbery muffins and nobody wants that. Scoop into muffin cups and bake. My oven claims it’s 350°F, but check yours. My sister’s runs hot and her muffins burned once. Here’s where I get creative—sometimes I pop a few chopped walnuts on top, or even a sprinkle of dark chocolate chips if I’m feeling fancy. Do what makes you happy. They puff up, crack a little on top, and the kitchen smells like peanut butter dreams. Serving Suggestions I may be dramatic, but these Healthy Peanut Butter Greek Yogurt Banana Bread Muffins are a legit game changer. Here’s what I love: Warm from the oven with a dab of extra peanut butter—true happiness. Sliced with a drizzle of honey or a little cinnamon. Oof, so good. Freeze a batch for busy mornings or snack emergencies. Super flexible, right? I’ve even snuck ’em into a couple of kids’ lunchboxes… zero complaints so far. Real Results: A Quick Table for Muffin Nerds Here’s a non-boring table to help you size up these muffins at a glance (because some of us need to know): Ingredient Focus Why It’s Good Texture Boost Nutrition Perk Greek Yogurt Swaps out oil/butter Makes it super moist Extra protein hit Peanut Butter Healthy fats, duh Nutty depth Satiety (it fills you up!) Banana Natural sweetener Soft muffin vibe Fiber & potassium “I tried these after you posted on your Insta, and oh man—they actually tasted like dessert but kept me full through my morning workout. My kids wolfed them down. Total win.” – Jen L. Common Questions Q: Can I use any kind of Greek yogurt? A: I stick with plain, low-fat Greek yogurt, but full-fat works if you want a richer muffin. Just don’t use the super runny kind. Q: What if I only have regular flour? A: That’s no big deal. Whole wheat just adds a little more fiber, but all-purpose flour works fine. Q: Can you freeze these muffins? A: Absolutely. I wrap them up, toss ’em in the freezer, then reheat in the microwave. Perfect for lazy days. Q: Will chunky or creamy peanut butter work best? A: Totally up to you. Creamy blends smoother, but I love the little peanut bits you get from the chunky kind. Q: How ripe do my bananas need to be? A: Go as ripe as possible. If they look a little scary, you’re on the right track. The flavor will be way deeper. Healthy Peanut Butter Greek Yogurt Banana…