Spicy Chile Lemonade

Spicy Chile Lemonade: 7 Delicious Secrets for the Ultimate Refreshment

Spicy Chile Lemonade is the unsung hero of summer beverages, transforming a simple childhood classic into a sophisticated, palate-awakening experience. Welcome to the kitchen, friends—or as we say here at Helth Recipe, welcome to the start of your next flavorful journey.

Real talk: I used to think lemonade was just sugar and water until my grandmother, the original kitchen boss, tossed a sliced jalapeño into her pitcher, claiming it was the only way to truly cool down in the village heat. That first sip of Spicy Chile Lemonade changed my life, proving that even the most humble ingredients can deliver five-star vibes if you treat them with respect.

Whether you are wearing your comfy slippers or hosting a backyard soirée, mastering Spicy Chile Lemonade is about more than just thirst—it is about nourishment for the soul.

Why is Spicy Chile Lemonade the ultimate secret to surviving a summer heatwave?

The science of sweat and cooling

Believe it or not, drinking an ice-cold glass of Spicy Chile Lemonade is actually one of the most effective ways to lower your body temperature. It sounds counterintuitive, but the capsaicin found in peppers triggers a signal to your brain that you are overheating, which jumpstarts your body’s natural cooling mechanism—sweating. While you might reach for a plain water, a Spicy Chile Lemonade works double-time to cool you down from the inside out.

The flavor awakening

When heat makes you feel lethargic, the sharp kick of a Spicy Chile Lemonade acts as an immediate sensory wake-up call. My grandmother always said that food should speak to you, and this drink shouts with vibrancy. The combination of acid and heat in Spicy Chile Lemonade cuts through the humidity, making you feel lighter and more refreshed than a sugary soda ever could.

Hydration with a kick

We all know we need to drink water, but let’s be honest, sometimes plain water is boring, and sipping on a Spicy Chile Lemonade makes hydration feel like a treat. By infusing water with citrus and spice, you are more likely to keep drinking, ensuring you stay hydrated during those scorching afternoons. It is the perfect companion while you are prepping a light meal, perhaps something like a Lemon Herb Dressing to go over a fresh salad.

Which specific peppers create the most electrifying flavor profile in your drink?

Jalapeño: The crisp classic

If you are new to the world of Spicy Chile Lemonade, the jalapeño is your best friend because it offers a crisp, grassy flavor that pairs beautifully with lemon. The heat is manageable for most, providing a gentle warmth at the back of the throat rather than a tongue-scorching burn. Using a jalapeño infused syrup is the standard way to introduce this pepper into your Spicy Chile Lemonade without overwhelming the palate.

Cayenne: The invisible heat

For those who want the punch without the vegetal taste of a fresh pepper, a Cayenne pepper lemonade is the way to go. A pinch of high-quality cayenne powder dissolves seamlessly, giving your Spicy Chile Lemonade a uniform heat that hits you immediately. It is a trick I use when I want the color to remain pure yellow, similar to the vibrant hue of my Lemon Poppy Seed dressing.

Habanero: For the brave souls

If you want to bring some serious five-star vibes and intensity to your glass, a habanero-based Spicy Chile Lemonade offers floral, fruity notes alongside significant heat. You have to be careful here; a little goes a long way, but the tropical aroma of the habanero elevates the Spicy Chile Lemonade into a complex cocktail-style beverage. It pairs surprisingly well with rich dishes, cutting through fats like those found in a Creamy Lemon Yogurt sauce.

Serrano: The grassy punch

Serrano peppers are for those who love the flavor of jalapeño but wish it had more bite in their Spicy Chile Lemonade. They have a bright, biting acidity that mimics the lemon itself, creating a seamless bridge between the fruit and the fire. When I make a Spicy Chile Lemonade with serranos, I slice them thin and leave them in the pitcher for that rustic, village-style presentation.

How can you master the perfect balance between citrus zest and fiery heat?

The syrup infusion technique

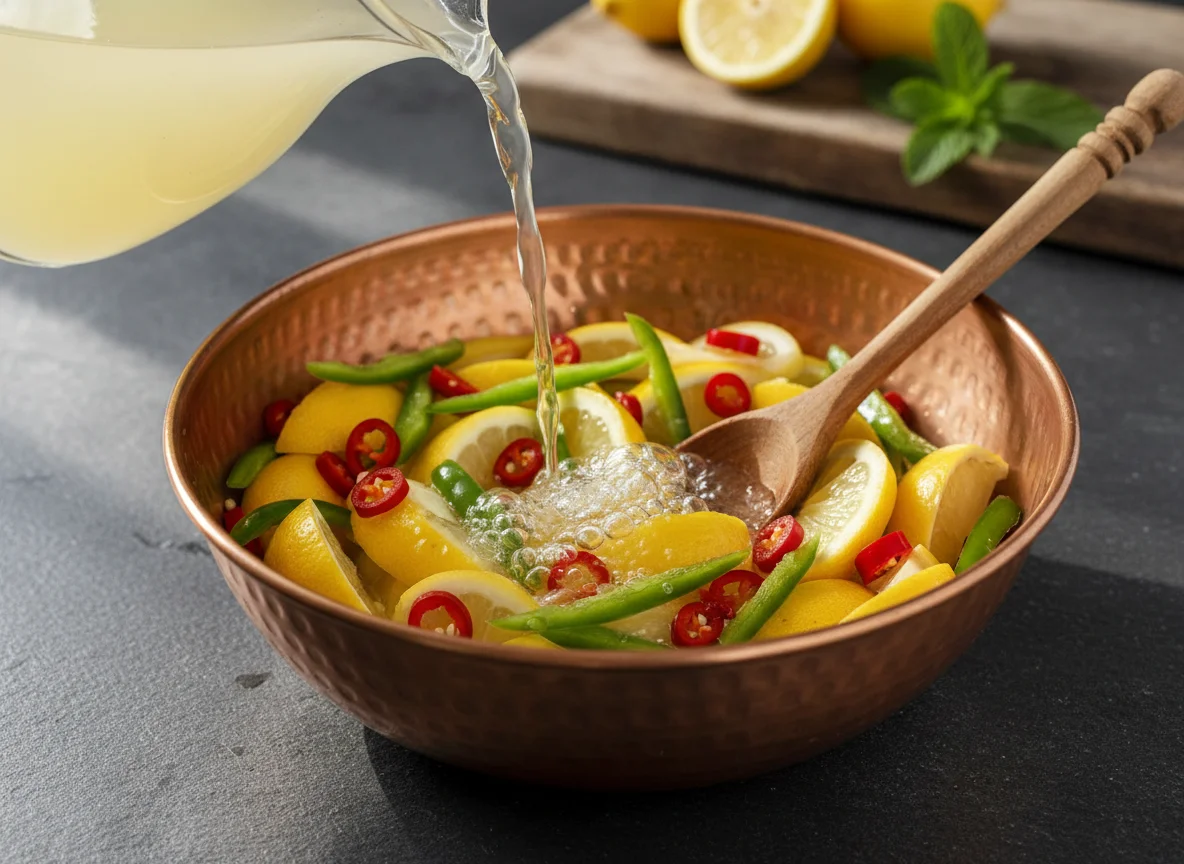
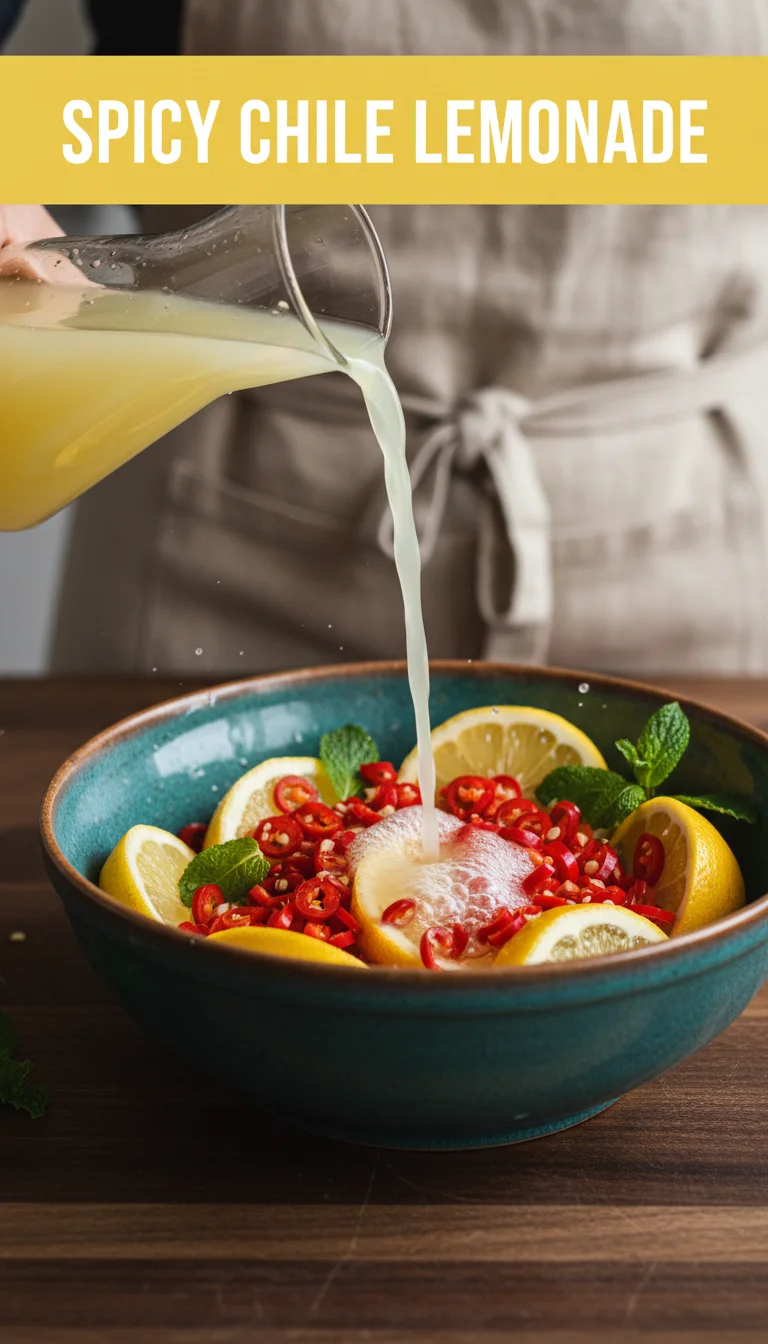
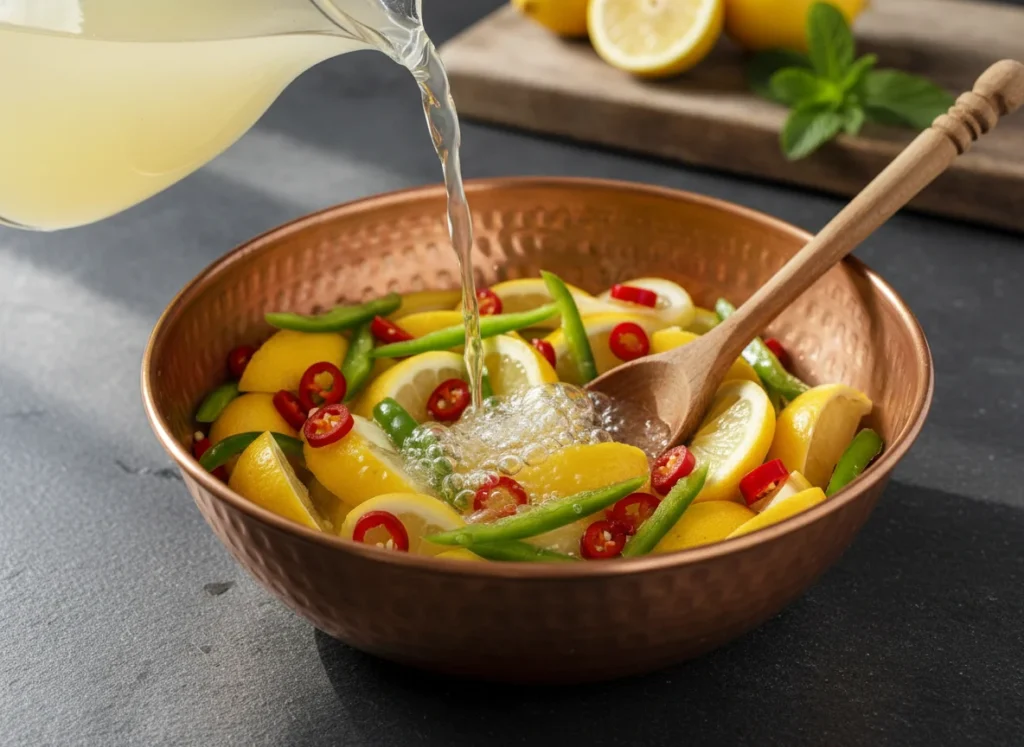
Real talk: never just dump chopped peppers into cold water and expect a great Spicy Chile Lemonade; you need to infuse the flavor into a simple syrup first. By simmering sugar, water, and chiles together, you extract the essential oils and capsaicin evenly, ensuring every sip of your Spicy Chile Lemonade is consistent. This technique is just as crucial as the reduction method I use for my Sweet and Sour Honey Lemon Paneer.

Acid vs. Sugar ratios

Because the heat adds a third dimension, your Spicy Chile Lemonade requires a slightly sweeter base than standard lemonade to counteract the burn. I recommend a ratio of 1 part lemon juice to 1.2 parts spicy syrup for the ideal sweet and heat balance. This ensures that the Spicy Chile Lemonade remains refreshing rather than becoming a challenge to drink.

The importance of resting time

Just like a good stew, a Spicy Chile Lemonade gets better if you let it sit in the fridge for at least an hour before serving. This allows the citrus oils to mingle with the spice, mellowing out any harsh edges in your Spicy Chile Lemonade. It is a lesson in patience, much like waiting for the flavors to meld in a lemon tahini sauce recipe.

Rim garnishes that matter

A Tajin rim garnish is not just for decoration; it adds a salty, tangy layer that prepares your tongue for the incoming Spicy Chile Lemonade. The salt suppresses bitterness and enhances the sweetness, making the drink pop. Serving your Spicy Chile Lemonade with a proper rim makes it feel like an occasion, even if you are just drinking it on your porch.

What are the surprising health benefits hidden within this spicy citrus concoction?

Metabolism boosting magic

The capsaicin in your Spicy Chile Lemonade does more than just taste good; it can slightly boost your metabolism. Capsaicin health benefits are well-documented, and combining them with lemon juice creates a drink that wakes up your digestive system. It is a functional beverage disguised as a treat, much like a morning 3 Minute Lemon Dijon Vinaigrette on greens can jumpstart your day.

Vitamin C powerhouse

Lemons are obviously packed with Vitamin C, but did you know that chile peppers often contain even more Vitamin C by weight? A glass of Spicy Chile Lemonade is a double dose of immune-boosting antioxidants. Drinking Spicy Chile Lemonade is a delicious way to ward off summer colds while enjoying the sunshine.

Digestion aid

In many cultures, spicy foods are consumed to aid digestion, and a Spicy Chile Lemonade can have a soothing effect on a heavy stomach. The acidity of the lemon helps break down food, while the spice stimulates gastric juices. I often serve a small glass of Spicy Chile Lemonade alongside a hearty meal like Lemon Garlic Skillet Chicken to keep things feeling light.

Mood elevation

There is a reason you feel a rush after eating something spicy; the pain receptors in your tongue trigger the release of endorphins, and sipping Spicy Chile Lemonade gives you a natural, happy buzz. It is a mood lifter in a glass. Sharing a pitcher of Spicy Chile Lemonade with friends guarantees laughter and good energy.

“Cooking is an observation. You watch the sugar dissolve, you smell the peppers release their oils, and you taste the magic happen. Spicy Chile Lemonade is the perfect example of simple observation leading to extraordinary flavor.” — Chef Niwala


Can you transform your next backyard party with these unique spicy lemonade variations?

The Sparkling Chile Fizz

For a celebration, I love topping my Spicy Chile Lemonade with sparkling water or club soda for some effervescence. The bubbles lift the spicy aroma to your nose before you even take a sip, making the Spicy Chile Lemonade experience multisensory. It is a sophisticated non-alcoholic option that feels just as fancy as champagne.

Grilled Lemon Smokey Twist

If you already have the grill fired up, throw your lemons on the grates before squeezing them into your Spicy Chile Lemonade. The caramelized, smoky citrus juice pairs incredibly well with the heat of the peppers. This version of Spicy Chile Lemonade brings a rustic, outdoor cooking vibe that honors the fire it came from.

Herbed Heat Infusion

Adding herbs like basil, mint, or cilantro to your Spicy Chile Lemonade creates a garden-fresh complexity. Mexican inspired beverages often utilize this technique, muddling herbs to release their oils. A basil-infused Spicy Chile Lemonade is particularly stunning, bridging the gap between savory and sweet.

The Boozy Sunset

While I love this drink as is, adding a splash of tequila or mezcal turns your Spicy Chile Lemonade into a world-class cocktail. The smokiness of mezcal complements the spice perfectly. Just remember, even with the alcohol, the star of the show remains the handcrafted Spicy Chile Lemonade base.

Key Takeaways

  • Infuse the Syrup: Always cook your peppers with the sugar and water to create a smooth, consistent heat for your Spicy Chile Lemonade.
  • Choose Your Pepper: Use jalapeños for crispness, cayenne for invisible heat, or habaneros for fruity intensity in your Spicy Chile Lemonade.
  • Balance is Key: Adjust your sugar ratio slightly higher to counteract the heat and use a salt rim to enhance the Spicy Chile Lemonade flavors.
  • Patience Pays Off: Let your Spicy Chile Lemonade rest in the fridge to allow the flavors to marry.
  • Health Bonus: Enjoy the metabolism and immune-boosting benefits that come naturally with every glass of Spicy Chile Lemonade.

For a complete summer feast, try pairing your refreshing glass with a savory main course like Lemon Garlic Skillet Chicken—the citrus notes harmonize perfectly. If you are looking for more research on the benefits of peppers, check out this guide on Capsaicin.

A vertical 9:16 layout. The top section contains the main keyword 'SPICY CHILE LEMONADE' in a bold, professional font on a clean background. The bottom section is a high-quality, professional hero shot of the final plated Spicy Chile Lemonade with fresh garnishes.

Spicy Chile Lemonade

Transform a simple childhood classic into a sophisticated, palate-awakening summer beverage with the vibrant flavors of citrus and spice.
Prep Time 15 minutes
Cook Time 10 minutes
Total Time 25 minutes
Servings: 4 servings
Course: Beverage, Cocktail
Cuisine: Mexican, Summer
Calories: 90

Ingredients
  

For the Syrup
  • 1 cup water For the syrup base.
  • 1 cup sugar Granulated sugar for sweetness.
  • 1-2 jalapeños fresh jalapeños Adjust based on desired heat level.
For the Lemonade
  • 1 cup fresh lemon juice Freshly squeezed for the best flavor.
  • 3-4 cups water Add more to dilute as desired.
  • 1 teaspoon cayenne pepper For invisible heat.
  • 1 habanero habanero pepper (optional) For those seeking serious heat.
Garnishes
  • 1 tablespoon Tajin seasoning For rimming glasses.

Method
 

Make the Syrup
  1. In a saucepan, combine 1 cup of water and 1 cup of sugar.
  2. Add 1-2 sliced jalapeños and simmer over medium heat until the sugar dissolves.
  3. Remove from heat and allow to cool. Strain to remove the jalapeños.
Prepare the Lemonade
  1. In a pitcher, combine the cooled syrup with 1 cup of fresh lemon juice.
  2. Add 3-4 cups of water to dilute the mixture to taste.
  3. If desired, stir in cayenne pepper and additional ingredients to increase heat.
Serve
  1. Rim glasses with Tajin seasoning.
  2. Pour the Spicy Chile Lemonade over ice and garnish as desired.

Notes

Let the lemonade rest in the fridge for at least an hour before serving to allow flavors to meld. Experiment with different peppers for unique heat profiles.

Similar Posts

  • healthy Moist Yogurt Carrot Cake Muffins for a Healthier Treat

    So, ever get that late-night urge for something sweet, but don’t really want to destroy all the healthy eating work you put in earlier? Yup, “been there, done that” about a million times. That’s why these healthy Moist Yogurt Carrot Cake Muffins for a Healthier Treat are my not-so-secret weapon. They totally hit the spot when you’re just not up for a heavy dessert, but still want something more than a sad rice cake. No weird ingredients, either! And you can whip these up pretty fast—no expert baking powers required. So, hang with me while I spill my favorite no-guilt muffin recipe. Why These Muffins? Okay, let’s be real. Regular carrot cake? Loaded with oil, sugar, and honestly, you just feel sort of… meh after one. My healthy Moist Yogurt Carrot Cake Muffins for a Healthier Treat solve that. They’re genuinely moist (not the dry hockey pucks you buy sometimes), lightly sweet, and you don’t need a truckload of oil or butter because Greek yogurt swoops in for the win. I like ‘em as a grab-and-go breakfast, but they work for dessert too. Also—carrots! I know, I know—“Veggies in my muffin?” Trust me, you don’t even notice except for this magical moist texture, plus a hint of carrot sweetness that totally works. Coconut sugar and a bit of honey keep everything just sweet enough. I make these all the time, and folks always ask for the recipe… or just make puppy eyes for seconds. “I can’t get over how these muffins actually taste like something you’d get at a five-star restaurant (yeah, I said it!) but with zero guilt. Perfect for my kiddos too.” – Jess R. Simple Steps to Make These Muffins Don’t sweat about needing fancy gear. You’ll need: one bowl, a whisk or fork (biceps optional), and a muffin tin. Here’s my general rundown: First, mix all your wet ingredients—Greek yogurt, eggs, a splash of vanilla, maybe a glug of honey. Whisk ’em good. Then, dump in your dry stuff (think flour, baking powder, cinnamon, a sprinkle of nutmeg if you’re feeling spicy, coconut sugar). Stir just to combine. Fold in grated carrots last. Don’t overmix, or you’ll end up with dense muffins. Pour into muffin cups and bake around 20 minutes, give or take (everyone’s oven is moody). Let ‘em cool, if you have that kind of willpower. I know, sounds basic. But seriously—it just works. Serving Suggestions Common Questions Q: Can I swap out the yogurt?  A: For sure. Any unsweetened plain yogurt works, even dairy-free. Texture might vary a tad, but still good. Q: How do I store these?  A: Keep them in an airtight container at room temp for two days, or fridge for up to five. I freeze ‘em too, grab out and zap in the microwave for those hangry moments. Q: Do I really need to peel the carrots?  A: Up to you! I’m lazy and skip it sometimes. Just wash well and grate. Q: Can I use a different sweetener?  A: Yes! Maple syrup, brown sugar, or even date paste will work. Tweak the amount and see what you like. Q: Kids picky? Will they notice the carrot?  A: Nope. Mine call them “orange muffins” and have zero clue. Muffin Perfection, Every Time Honestly, there’s nothing like pulling a tray of these healthy Moist Yogurt Carrot Cake Muffins for a Healthier Treat out of the oven and smelling all that cinnamon-carrot goodness. Plus, you can make little changes—add walnuts, raisins, or skip them if you want. If you want more on why yogurt is so awesome, this Mayo Clinic article got me hooked. Point is, don’t be afraid to get creative. Anyway, you gotta try making these. Promise, they’ll be in your regular baking rotation after one bite!   A healthy twist on classic carrot cake! These moist yogurt carrot cake muffins are light, naturally sweetened, and perfect for breakfast, snack time, or guilt-free dessert.

  • healthy Orange Scones

    Why You’ll Fall for These Orange Scones The Simple Ingredients You Actually Need Step-By-Step: Bringing Orange Scones to Life Serving Suggestions To Level Up Common Questions Go On, Make Your Mornings Way Less Boring Orange Scones are kinda magical when you want something quick for breakfast, but also wanna trick your brain into thinking you’re at a five-star restaurant. Ever drag yourself outta bed and just want a treat to make the day less… meh? Yep, been there. I actually started making these because regular scones got way too boring and, okay, my neighbor wouldn’t stop bragging about her “famous” lemon version. Orange scones hit different. Seriously, that citrusy thing going on is just—wow. If you’re tired of sad donuts or cold cereal, let’s get you sorted out right here.   this … Why You’ll Fall for These Orange Scones Listen, nobody wants a dry, crumbly brick on the plate. The whole idea is to get a scone that’s bright and soft on the inside, with just a hint of gold crunch outside. These orange scones are super easy, too. I’m not just saying that—real talk, my thirteen-year-old cousin bakes them without setting off the smoke alarm. You don’t need a mixer. You don’t even need fancy tools. Mixing with your hands is cool (honestly, it’s kinda therapeutic). The burst of orange makes the kitchen smell like living inside a fruit basket. Sometimes I toss in a handful of chocolate chips, but don’t tell the purists. Go wild with the zest. I always say, “More zest, more best!” There’s science somewhere about citrus making you happy—I say just trust the process.   The Simple Ingredients You Actually Need Here’s the best part: most of this stuff’s already hanging out in your kitchen right now. Really. You’ll need: All-purpose flour—yep, nothing fancy Cold butter (don’t you dare soften it) White sugar and a little pinch of salt (don’t skip this) A juicy orange (zest and juice both, please) Milk or cream (either’s fine—don’t overthink) Baking powder for the puff Maybe an egg, if you’re feelin’ extra Mix this all up and try not to eat the dough raw. Old habits die hard.   Step-By-Step: Bringing Orange Scones to Life First thing, crank up your oven. You want it hot—about 400°F. While it’s preheating, grab a big bowl. Dump in your flour, sugar, baking powder, and salt. Now toss those cold, cubed butter pieces in. Cut them in with your fingers or a pastry cutter, and don’t stress if a few chunks are bigger. Grate in all that lovely orange zest (seriously, let’s not be stingy). Pour in juice and milk (I splash both instead of measuring). If you’re using an egg, whisk and add now. Stir until just combined. Don’t you dare overmix. Plop dough on a floured counter, pat into a messy round disk (about an inch thick), and slice it like a pizza. The rougher the cut, the more rustic and bakery-looking. Set on a sheet lined with parchment. Brush tops with more milk (makes ’em golden). Bake 13-15 minutes till just lightly brown. Let cool for a hot second before eating so you don’t burn your tongue (again… it happens, trust me).   Serving Suggestions To Level Up Top with orange glaze or drizzle with melted chocolate if feeling snazzy. Serve warm with real butter—never margarine, come on now. Toss leftovers in the toaster next morning for a crispy redo. Pair with strong coffee or black tea to cut the sweetness. Common Questions Can I make orange scones ahead of time? Absolutely! I usually bake extra and freeze a few. Just let ’em cool first, then wrap tight. Reheat in oven for a just-baked feel. What if I only have mandarins or clementines? No problem. Go for it. The flavor will be a titch sweeter, but honestly, you might like that better. How do I stop them from being too dry? Don’t overmix the dough and make sure your butter is cold. A little drizzle of extra cream on top before baking never hurts. Do I need a glaze? Nope! I’m team “depends on my mood.” Sometimes a broken scone and a pat of butter is all you need. But a simple orange-powdered sugar glaze makes them café-level. Can I use store-bought orange juice? Eh. Sure, if you’re in a pinch. But fresh is way, way better. You’ll notice the zing. I’ve tried probably fifteen recipes, but this one? Perfection. My husband asked if I bought them from that expensive bakery down the street. Nope, just my own two hands! – Dani M., Vermont…

  • Greek Yogurt Lemon Blueberry Pancake Bites

    Why Greek Yogurt Lemon Blueberry Pancake Bites Are The Ultimate Breakfast Hack How To Make Greek Yogurt Lemon Blueberry Pancake Bites Serving Suggestions: Pump Up The Pancake Bites My Actual Experience (Messy Kitchen Edition) Common Questions Ready For A Breakfast Glow-Up? Greek Yogurt Lemon Blueberry Pancake Bites have basically rescued my morning routine more than once. There’s just something about craving a pancake breakfast but hating the whole flipping and babysitting-the-pan thing. Maybe you know the struggle too. Mini pancake bites? Way less drama. These things are bright, poppable, and honestly? They feel a little fancier than cereal but way less work than full-on pancakes. this … Why Greek Yogurt Lemon Blueberry Pancake Bites Are The Ultimate Breakfast Hack Alright, real talk. I used to skip breakfast. Always running late, or leaving the house with just coffee. Then these Greek Yogurt Lemon Blueberry Pancake Bites showed up in my life. They’re soft, a little tangy, fruity—but they’re not like dessert-for-breakfast sweet. The Greek yogurt keeps them super moist and gives a bit of protein too, so I don’t get that carb crash. Plus, I can make a whole batch ahead of time. The first time I brought a baggie to work, I felt like I’d hacked breakfast. You get the lemon, that zing, plus blueberries in every bite. Don’t even get me started on how good they smell. I’d argue these are way easier (and tastier!) than standing by a stove, waiting for each pancake to bubble. How To Make Greek Yogurt Lemon Blueberry Pancake Bites Getting these babies in the oven is honestly not rocket science. You’ll need a mixing bowl, a muffin pan (mini or regular, whatever you’ve got), and…that’s it. Start with your favorite pancake mix as a base if you’re short on time. In a bowl, mix together the following: Greek yogurt (I use plain, but I’ve done vanilla in a pinch and it’s awesome) An egg (this helps things stick; don’t skip it) A dash of vanilla extract, for the cupcake-y vibes Freshly squeezed lemon juice and a little zest for extra zing Blueberries (fresh is magical, but frozen works—don’t even sweat it) Once the batter’s done, just spoon it into the muffin tin and pop in the oven (I usually set it to 350°F). Bake about 12-15 minutes, until the tops are golden. Sometimes mine look a little wonky on top, but that’s just pancake personality. Ingredient What It Adds Swaps Pro Tip Greek Yogurt Moisture & protein Plain yogurt Thicker yogurt = fluffier bites Lemon Zesty flavor Lime Zest first, then juice Blueberries Sweet, juicy pops Raspberries Dust with flour to stop sinking Serving Suggestions: Pump Up The Pancake Bites Let’s be honest, Greek Yogurt Lemon Blueberry Pancake Bites taste amazing fresh from the oven. But if you want to jazz them up, here you go: Dip them in maple syrup for dessert-vibes Toss them in a lunchbox for a sweet surprise Freeze extras and pop them in the microwave for a busy day You can also crush some with a fork, add a dollop of extra Greek yogurt, and call it a deconstructed parfait if you’re feeling extra. My Actual Experience (Messy Kitchen Edition) So, here’s the honest scoop. The first time I made Greek Yogurt Lemon Blueberry Pancake Bites, I totally overfilled the muffin cups. Half the batch puffed up wild, like little volcanoes. My kitchen smelled like Sunday brunch at a fancy B&B, though, and that kind of made up for the mess. The flavor? Legit. Zingy lemon hits first, then the blueberry pops bring it all together with the creamy background from the yogurt. These don’t last more than a day at my house—my sister snags them before I can even pack lunch. “These are so good, I started making them for my kids’ breakfast, and now my husband takes them for his coffee break too. Minimal mess, major win—thanks for sharing!” – Lara, real-life reader and pancake-bite convert Common Questions Q: Can I use flavored Greek yogurt? A: Yes! Strawberry or vanilla Greek yogurt is delicious. Just watch out for extra sweetness. Q: What if I don’t have fresh lemons? A: Use bottled lemon juice. Not as bright, but hey, it gets the job done. Q: Will these work with gluten-free flour? A: Absolutely. I’ve swapped in gluten-free mix and the bites came out puffy and soft. Q: Can I freeze these little bites? A: You bet. They reheat so well. Just zap them in the microwave for 20 seconds. Q: My blueberries sink to the bottom. Any fix? A: Toss them in a bit of flour before mixing in. Old baker’s trick, easy win. Ready For A Breakfast Glow-Up?…