Classic Stuffed Cabbage Rolls Recipe – 5 Easy Steps for a Comfort Food Delight
Stuffed cabbage rolls are a timeless comfort food cherished across many cultures. These tender cabbage leaves, filled with a savory meat and rice mixture, simmered in a rich tomato sauce, create the perfect balance of flavors. Whether you’re preparing them for a holiday meal or a cozy family dinner, this Classic Stuffed Cabbage Rolls recipe will surely impress.
Table of Contents

Ingredients for Classic Stuffed Cabbage Rolls
For the Cabbage Rolls
- 1 large head of green cabbage
- 1 lb ground beef (or pork/beef mix)
- 1 cup cooked white rice
- 1 medium onion, finely chopped
- 2 cloves garlic, minced
- 1 egg, lightly beaten
- 2 tbsp fresh parsley, chopped
- 1 tsp paprika
- Salt and pepper to taste
For the Tomato Sauce
- 2 tbsp olive oil
- 1 medium onion, finely chopped
- 2 cloves garlic, minced
- 1 can (28 oz) crushed tomatoes
- 1 tbsp tomato paste
- 1 tsp sugar (optional)
- 1 tsp dried oregano
- 1 tsp dried basil
- Salt and pepper to taste
Step 1: Preparing the Cabbage
- Core the cabbage: Using a sharp knife, carefully cut out the core from the cabbage.
- Boil the cabbage: Bring a large pot of salted water to a boil. Submerge the cabbage head in the boiling water and cook for 3–5 minutes. As the outer leaves soften, carefully peel them off and place them on a towel to drain. Continue until all large leaves are removed.
Step 2: Making the Filling
- In a large mixing bowl, combine ground beef, cooked rice, chopped onions, minced garlic, egg, parsley, paprika, salt, and pepper.
- Mix well until all ingredients are evenly distributed.
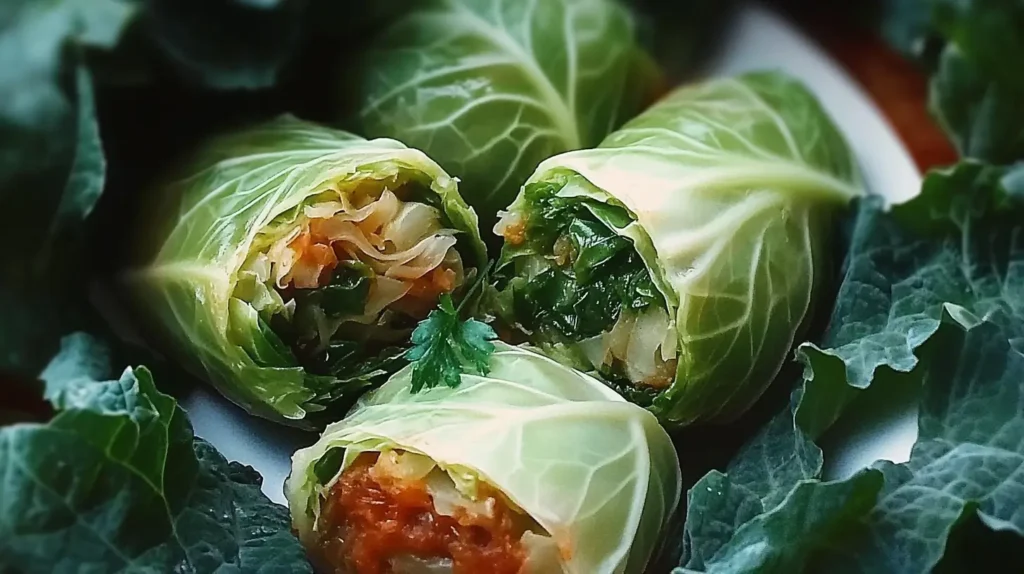
Step 3: Assembling the Stuffed Cabbage Rolls
- Lay a cabbage leaf flat on a clean surface.
- Place about 2 tablespoons of the meat filling in the center.
- Fold the sides of the leaf over the filling, then roll it tightly from the bottom to the top.
- Repeat with the remaining cabbage leaves and filling.
Step 4: Cooking the Cabbage Rolls
- In a large pot or Dutch oven, heat olive oil over medium heat.
- Add chopped onions and garlic, cooking until softened.
- Pour in crushed tomatoes, tomato paste, oregano, basil, salt, and pepper. Stir well and simmer for 5 minutes.
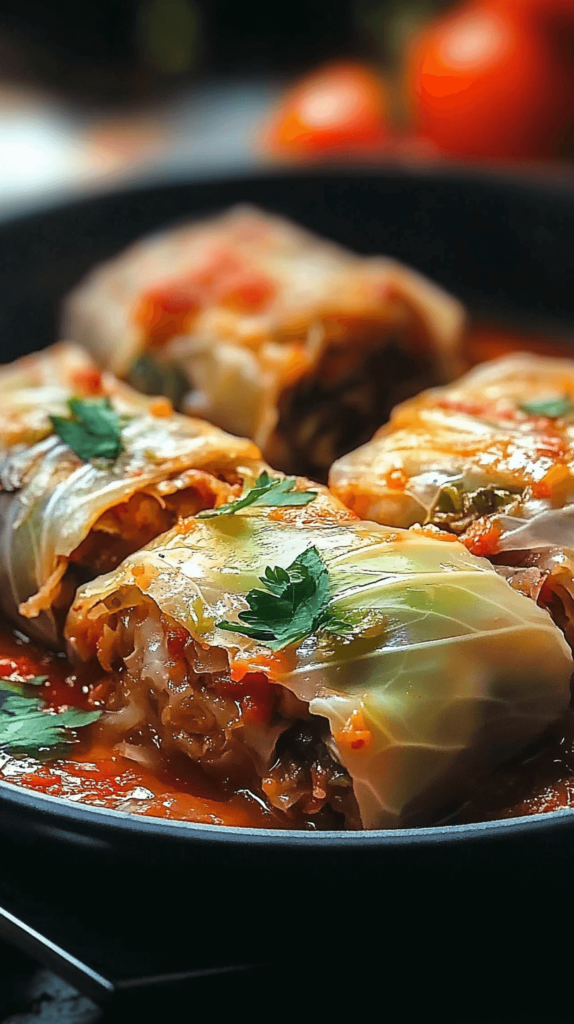
- Arrange the stuffed cabbage rolls in the pot, seam-side down. Spoon some sauce over the top to ensure they’re coated.
- Cover the pot and simmer on low heat for 1.5 to 2 hours.
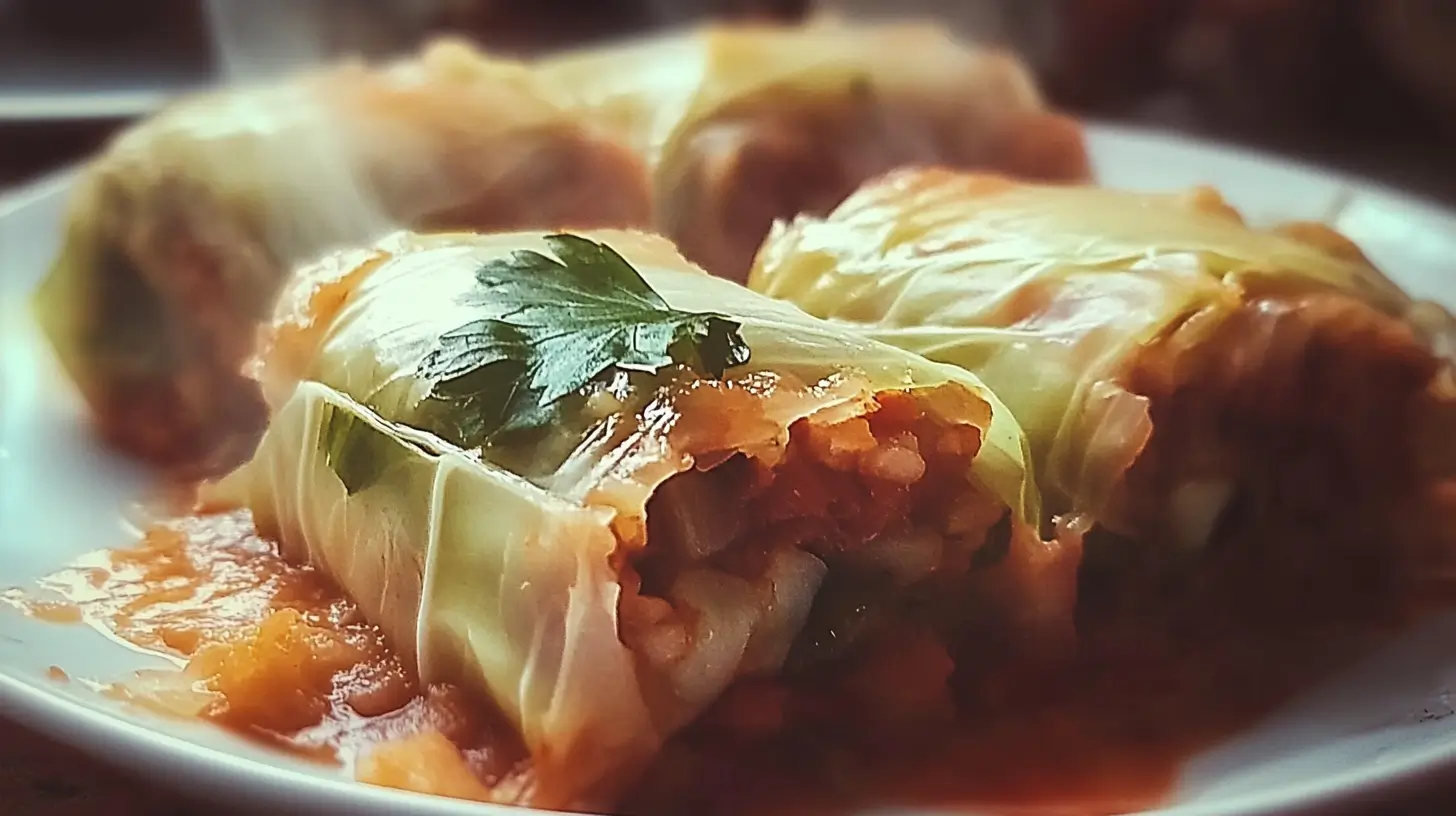
Step 5: Serving the Classic Stuffed Cabbage Rolls
Serve the cabbage rolls hot with a generous ladle of tomato sauce. Garnish with fresh parsley for an added touch of flavor.
Tips for Perfect Classic Stuffed Cabbage Rolls
- Softening Cabbage Leaves: Freezing the cabbage overnight and thawing it the next day can also soften the leaves without boiling.
- Flavor Boost: Add a splash of Worcestershire sauce or a sprinkle of smoked paprika to the filling for extra depth.
- Storage: Store leftovers in an airtight container in the fridge for up to 4 days or freeze for up to 3 months.
Classic Stuffed Cabbage Rolls Variations
- Vegetarian Option: Substitute the meat filling with a mixture of lentils, mushrooms, and quinoa for a hearty meat-free version.
- Spicy Twist: Add a pinch of red pepper flakes to the tomato sauce for a kick of heat.
- Cheesy Delight: Sprinkle shredded mozzarella or Parmesan cheese over the rolls before serving.
FAQs
How do you keep stuffed cabbage rolls from falling apart?
Tightly roll the cabbage leaves around the filling and place them seam-side down in the pot to prevent them from unraveling.
Can I prepare stuffed cabbage rolls in advance?
Yes! You can assemble the rolls up to a day in advance and refrigerate them until ready to cook.
What’s the best side dish for stuffed cabbage rolls?
Mashed potatoes, buttered noodles, or crusty bread pair beautifully with stuffed cabbage rolls.
Is it better to cook cabbage rolls in the oven or on the stovetop?
Both methods work well. The stovetop method creates a rich, simmered sauce, while baking them at 350°F for about 1.5 hours results in tender, evenly cooked rolls.
Can I freeze classic stuffed cabbage rolls?
Absolutely! Freeze uncooked rolls on a baking sheet, then transfer them to an airtight container. Thaw overnight before cooking.
What’s the best way to reheat stuffed cabbage rolls?
Reheat in a covered pot with a little extra tomato sauce over low heat to keep them moist and tender.
With their rich flavor and satisfying texture, Classic Stuffed Cabbage Rolls offer a nostalgic taste of home. This timeless recipe combines simple ingredients with careful preparation to deliver a hearty, comforting meal that your family will love. Whether for a festive gathering or a simple weeknight dinner, these cabbage rolls are guaranteed to be a hit.
Detailed Exploration of the Recipe
The History of Stuffed Cabbage Rolls
Stuffed cabbage rolls, also known as “golabki” in Polish, “holubtsi” in Ukrainian, or “sarma” in Balkan cuisine, have a rich history that spans across Europe and into the Middle East. Each culture has its own unique twist on the dish, but the core concept remains the same: tender cabbage leaves wrapped around a flavorful filling, often meat and rice, and simmered in a savory sauce.
The dish is believed to have originated in the Middle East and was brought to Eastern Europe through trade routes. Over time, it became a staple in many Eastern European households, especially during the colder months when hearty, comforting meals were essential.
The Importance of Choosing the Right Cabbage
The type of cabbage you use can significantly impact the final dish. Green cabbage is the most commonly used variety due to its large, flexible leaves and mild flavor. However, savoy cabbage, with its crinkled leaves, can also be used for a slightly different texture and taste.
When selecting a cabbage, look for one that is firm and heavy for its size, with crisp, vibrant leaves. Avoid cabbages with wilted or discolored leaves, as they may not hold up well during the cooking process.
Preparing the Cabbage Leaves
One of the most crucial steps in making stuffed cabbage rolls is properly preparing the cabbage leaves. The goal is to soften the leaves enough so they are pliable and easy to roll without breaking. There are a few methods to achieve this:
- Boiling: This is the most common method. By boiling the cabbage head, the outer leaves become soft and can be easily peeled away. It’s essential to handle the leaves gently to avoid tearing them.
- Freezing: Another method is to freeze the entire cabbage head overnight. When you thaw it, the leaves will be soft and pliable. This method can be more convenient as it eliminates the need for boiling.
- Microwaving: For a quicker option, you can microwave the cabbage head for a few minutes to soften the leaves. However, this method requires careful monitoring to prevent overcooking.
Crafting the Perfect Filling
The filling is the heart of the stuffed cabbage rolls, and getting it right is key to a delicious dish. The classic filling consists of ground meat, rice, onions, garlic, and seasonings. Here are some tips for crafting the perfect filling:
- Meat Selection: While ground beef is the most traditional choice, a mix of ground beef and pork can add extra flavor and moisture. For a leaner option, ground turkey or chicken can be used.
- Rice: Use cooked white rice for the best texture. Brown rice can also be used for a healthier option, but it may result in a slightly firmer filling.
- Seasonings: Don’t skimp on the seasonings. Paprika, parsley, salt, and pepper are essential, but feel free to experiment with other herbs and spices like thyme, rosemary, or cumin.
- Binding Agents: The egg in the filling acts as a binder, helping to hold the mixture together. If you’re making a vegetarian version, you can use a flax egg (1 tbsp ground flaxseed mixed with 3 tbsp water) as a substitute.
Assembling the Rolls
Assembling the cabbage rolls may seem daunting at first, but with a little practice, it becomes second nature. Here’s a step-by-step guide to ensure your rolls are perfectly assembled:
- Lay Out the Leaves: Place a softened cabbage leaf on a clean surface. If the leaf has a thick stem, you can trim it down to make rolling easier.
- Add the Filling: Place about 2 tablespoons of the meat mixture in the center of the leaf. Be careful not to overfill, as this can make rolling difficult and cause the rolls to burst during cooking.
- Fold and Roll: Fold the sides of the leaf over the filling, then roll it tightly from the bottom to the top. The goal is to create a neat, compact roll that will hold together during cooking.
- Seam-Side Down: Place the rolled cabbage seam-side down in the pot. This helps to keep the rolls from unraveling as they cook.
Cooking the Cabbage Rolls
Cooking the cabbage rolls low and slow is the secret to tender, flavorful rolls. The simmering process allows the flavors to meld together and the cabbage leaves to become incredibly tender. Here’s how to do it:
- Prepare the Sauce: Start by sautéing onions and garlic in olive oil until softened. Add crushed tomatoes, tomato paste, and seasonings, and let the sauce simmer for a few minutes to develop flavor.
- Arrange the Rolls: Place the stuffed cabbage rolls seam-side down in the pot, nestling them closely together. This helps to keep them from moving around and unraveling during cooking.
- Cover with Sauce: Spoon some of the tomato sauce over the top of the rolls to ensure they are well-coated. This not only adds flavor but also helps to keep the rolls moist.
- Simmer: Cover the pot and let the rolls simmer on low heat for 1.5 to 2 hours. The long cooking time allows the flavors to develop and the cabbage leaves to become tender.
Serving Suggestions
Stuffed cabbage rolls are a complete meal on their own, but they can be paired with a variety of side dishes to create a more substantial feast. Here are some serving suggestions:
- Mashed Potatoes: Creamy mashed potatoes are a classic accompaniment to stuffed cabbage rolls. The creamy texture pairs beautifully with the savory rolls.
- Buttered Noodles: Simple buttered egg noodles are another great option. They soak up the tomato sauce and add a comforting element to the meal.
- Crusty Bread: A loaf of crusty bread is perfect for mopping up any leftover sauce on your plate.
- Green Salad: A fresh green salad with a light vinaigrette can provide a refreshing contrast to the rich, savory rolls.
Storing and Reheating
Stuffed cabbage rolls are a great make-ahead dish, and they store well in the fridge or freezer. Here’s how to store and reheat them:
- Refrigeration: Store leftover cabbage rolls in an airtight container in the fridge for up to 4 days. To reheat, place them in a pot with a little extra tomato sauce and heat over low heat until warmed through.
- Freezing: You can freeze uncooked or cooked cabbage rolls. For uncooked rolls, place them on a baking sheet and freeze until solid, then transfer to an airtight container. For cooked rolls, let them cool completely before freezing. Thaw overnight in the fridge before reheating.
- Reheating: Reheat cabbage rolls in a covered pot with a little extra tomato sauce over low heat. This helps to keep them moist and prevents them from drying out.
Variations and Customizations
One of the great things about stuffed cabbage rolls is their versatility. Here are some variations and customizations you can try:
- Vegetarian Option: For a meat-free version, substitute the ground meat with a mixture of cooked lentils, mushrooms, and quinoa. You can also add grated carrots or zucchini for extra flavor and texture.
- Spicy Twist: If you like a bit of heat, add a pinch of red pepper flakes or a dash of hot sauce to the tomato sauce. You can also use a spicy sausage in the filling for an extra kick.
- Cheesy Delight: For a cheesy twist, sprinkle shredded mozzarella or Parmesan cheese over the rolls before serving. You can also add a layer of cheese inside the rolls for a gooey, melty surprise.
- Different Sauces: While tomato sauce is the most traditional, you can experiment with other sauces. A creamy mushroom sauce or a tangy yogurt sauce can add a unique twist to the dish.
Nutritional Information
Stuffed cabbage rolls are not only delicious but also relatively nutritious. Here’s a breakdown of the nutritional content per serving (based on 6 servings):
- Calories: 350
- Protein: 20g
- Carbohydrates: 25g
- Fat: 18g
- Fiber: 5g
- Sugar: 8g
Keep in mind that the nutritional content can vary depending on the specific ingredients and portion sizes used.
Conclusion
Classic Stuffed Cabbage Rolls are a comforting, hearty dish that brings warmth and nostalgia to any meal. With their tender cabbage leaves, savory filling, and rich tomato sauce, they are a true delight for the senses. Whether you’re cooking for a special occasion or simply craving a comforting meal, this recipe is sure to satisfy.
PrintClassic Stuffed Cabbage Rolls

Tender cabbage leaves filled with a savory meat and rice mixture, simmered in a rich tomato sauce, creating a perfect balance of flavors.
- Prep Time: 20 minutes
- Cook Time: 120 minutes
- Total Time: 140 minutes
- Yield: 6 servings 1x
- Category: Main Course
- Method: Stovetop
- Cuisine: Eastern European
- Diet: None
Ingredients
- 1 large head of green cabbage
- 1 lb ground beef (or pork/beef mix)
- 1 cup cooked white rice
- 1 medium onion, finely chopped
- 2 cloves garlic, minced
- 1 egg, lightly beaten
- 2 tbsp fresh parsley, chopped
- 1 tsp paprika
- Salt and pepper to taste
- 2 tbsp olive oil
- 1 medium onion, finely chopped
- 2 cloves garlic, minced
- 1 can (28 oz) crushed tomatoes
- 1 tbsp tomato paste
- 1 tsp sugar (optional)
- 1 tsp dried oregano
- 1 tsp dried basil
- Salt and pepper to taste
Instructions
- Core the cabbage by cutting out the core from the cabbage head.
- Boil the cabbage in salted water for 3–5 minutes, gently peeling off the softened outer leaves.
- In a large bowl, combine ground beef, cooked rice, chopped onions, minced garlic, egg, parsley, paprika, salt, and pepper. Mix well.
- Lay a cabbage leaf flat, place about 2 tablespoons of filling in the center, fold the sides over, and roll tightly.
- In a large pot, heat olive oil, cooking chopped onions and garlic until softened.
- Add crushed tomatoes, tomato paste, oregano, basil, salt, and pepper. Simmer for 5 minutes.
- Arrange the stuffed cabbage rolls seam-side down in the pot, spoon sauce over the top, cover, and simmer on low heat for 1.5 to 2 hours.
- Serve rolls hot with tomato sauce and garnish with fresh parsley.
Notes
For softer cabbage leaves, freeze the cabbage overnight and thaw before using. You can customize the filling for a vegetarian version or add spices for heat.
Nutrition
- Serving Size: 1 serving
- Calories: 350
- Sugar: 8g
- Sodium: 600mg
- Fat: 18g
- Saturated Fat: 7g
- Unsaturated Fat: 8g
- Trans Fat: 0g
- Carbohydrates: 25g
- Fiber: 5g
- Protein: 20g
- Cholesterol: 50mg

Classic Stuffed Cabbage Rolls
Ingredients
Method
- Core the cabbage by cutting out the core from the cabbage head.
- Boil the cabbage in salted water for 3–5 minutes, gently peeling off the softened outer leaves.
- In a large bowl, combine ground beef, cooked rice, chopped onions, minced garlic, egg, parsley, paprika, salt, and pepper.
- Mix well.
- Lay a cabbage leaf flat, place about 2 tablespoons of filling in the center, fold the sides over, and roll tightly.
- Repeat with the remaining cabbage leaves and filling.
- In a large pot, heat olive oil, cooking chopped onions and garlic until softened.
- Add crushed tomatoes, tomato paste, oregano, basil, salt, and pepper. Simmer for 5 minutes.
- Arrange the stuffed cabbage rolls seam-side down in the pot, spoon sauce over the top, cover, and simmer on low heat for 1.5 to 2 hours.
- Serve rolls hot with tomato sauce and garnish with fresh parsley.